

Last Updated on September 14, 2025
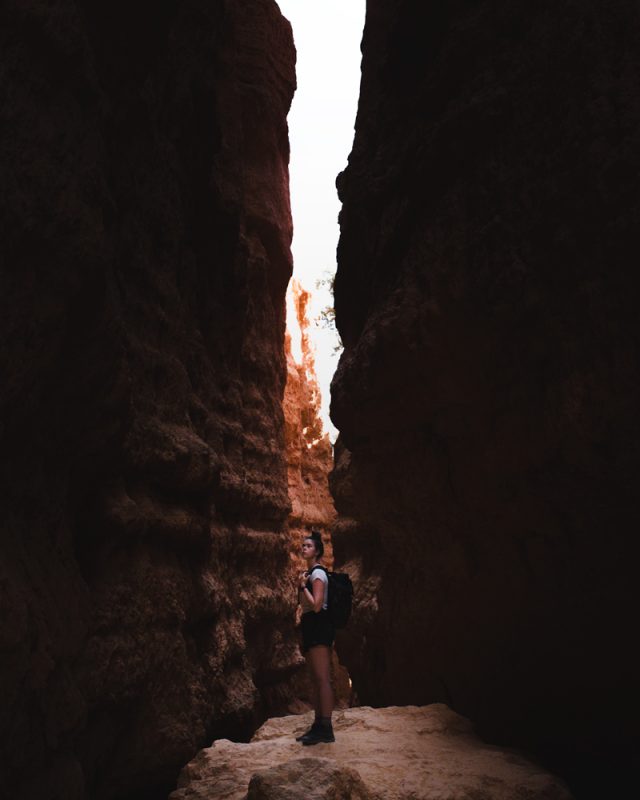
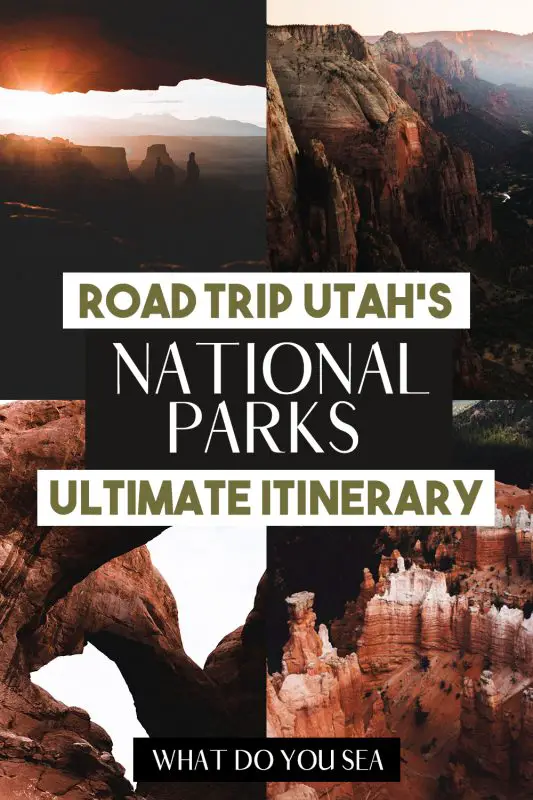
In the heart of the American Southwest is one of the most adventurous trips in the United States, a Utah National Parks road trip. These National Parks, nicknamed “Utah’s Mighty Five”, hold enough awe and beauty to SPOIL you for seven, ten, or even two-week road trip itineraries! During my own Utah road trip, I set out to thoroughly explore each park: Arches National Park, Canyonlands National Park, Capitol Reef National Park, Bryce Canyon National Park, and Zion National Park. Each of them offers entirely different things, which is why these stops make such an amazing summer vacay. You’ll munch on sandwiches overlooking the White Rim Overlook in Canyonlands, see the milky way over Delicate Arch, and traverse one of the most scenic hikes in the WORLD, the Narrows! All this, bundled with so much more is sure to tame your itchy travel bug and leave you eager to explore more National Parks in the United States.
All of my life I took the beauty of the United States for granted as I went abroad, but after making my own road trip around Utah, my own home is one of my favorite places to explore! I made sure this Utah road trip itinerary is the most detailed travel guide you’ll find on the internet! This itinerary includes detailed trail guides, tips for saving money and staying safe, AND optional pit stops along the way like the infamous Monument Valley, Dead Horse Point State Park, Factory Butte that most people fail to mention! Whether you’re coming from Salt Lake City, Denver, Las Vegas, the East Coast, or the South, the Southwest is sure to wrap you up, make you feel at home, and show you all the ways the United States is one of the most diverse countries in the world! Let’s go!
This post may contain affiliate links for the products I mentioned, but as always, all opinions are my own. I make a small commission, at no extra cost to you, when you make a purchase or booking through these links. This helps to support this space and keep me blogging, which I am so extremely thankful for.
Utah National Parks Road Trip Itinerary FAQ’s
-
How many days do you need for Utah National Parks?
The amount of time you need to see Utah’s Mighty Five depends on your travel style. I like to be thorough when I travel and really spend some time in an area, so this road trip itinerary reflects the IDEAL amount of time to spend in each park. I’ve heard of people going through all five of the parks in five days, seven days, ten days, fourteen days, so it really varies. I will say that anything less than 10-14 days is going to be a whirlwind trip, exhausting, and you likely won’t get to see the highlights of all the parks. I spent roughly ten days exploring the parks and THAT felt very fast.
If you just like to see highlights, you can definitely complete this in a shorter amount of time, however, I recommend using the full two weeks if you have it.
-
What is the best time to visit Utah National Parks?
The most ideal time to leave for a Utah National Parks road trip is either spring or fall for two reasons: the weather is ideal and there are far fewer people in these seasons. You can complete this in the summer, just know that it is going to be very TOASTY with a lot of people exploring with you. If you don’t like hot weather, avoid summer at all costs. It is the busiest time of year for the parks, but if you can get up early for sunrise hikes and take advantage of those early morning hours, you can easily get places like the Delicate Arch and the Narrows all to yourself. Winter gets a bit more tricky with road and trail closures, but it is the least busy, so while it isn’t impossible, it’s just not ideal if you want to see everything.
-
Where should I start my Utah National Parks road trip itinerary?
Starting your Utah road trip itinerary depends on where you’re starting from and there are a few main points most people begin their adventures: Salt Lake City, Denver, and Las Vegas.
If you’re coming from the Northeast or East, Denver, or Salt Lake City, start your itinerary in Arches National Park.
If you’re coming from the Pacific Northwest, Inland Northwest, or Las Vegas, start your road trip in Zion National Park.
Utah National Park Road Trip Itinerary Overview
Arches National Park | 3 Days
Canyonlands National Park | 2 Days
Capitol Reef National Park | 2 Days
Bryce Canyon National Park | 2 Days
Zion National Park | 4 Days
Transit Days | 1-2 Days
Day One | Drive To Arches National Park

– Settle into camp or your hotel after arriving in Moab. Stretch your legs on a sunset hike inside Arches National Park.
– DRIVETIME | 3-6 HOURS (depending on departure city)
The first day of this Utah National Parks road trip is going to be driving to the first of the Mighty Five, Arches National Park. Depending on where you’re coming from and what your method of transport is, the time to actually get to the park is going to vary. For example, my friend and I drove to Arches from Dallas, Texas and it took us two days to get there including an overnight stay in Albuquerque, New Mexico. On your way, put on your favorite podcast for road trips and enjoy the views!
This itinerary accounts for one day worth of driving to get to the park, so if it takes you more than one day to get here, I recommend dropping a day off of either Capitol Reef or Canyonlands National Park. This leaves you with only a half-day in one or both of the parks. If possible, I suggest adding days to your trip to account for the extra driving rather than spending less time exploring, but that is up to what works best for you.
You’ll likely arrive in Moab, the town next to Arches, in the evening, which is great timing to get some dinner and squeeze in a sunset hike if you’re up for it. The hikes in Arches National Park all have amazing views for sunset, but the best trails this time of day are the Tower Arch Trail, Delicate Arch, Sand Dune Arch, Park Avenue, and the Windows Loop Trail. After spending the majority of the day in the car, you probably won’t want anything incredibly difficult or tiring, so my recommendations are Sand Dune Arch or the Park Avenue Trail. These trails aren’t busy this time of day, except Delicate Arch, and both are more of a casual stroll than an actual hike. Plus, the lighting is beautiful for these trails this time of day if you’re into photography! If you make it to the park early enough, you may even have time to do both!
Before you start hitting the trails, make sure you stop into the visitor’s center. You’ll find a few handy things during this pit stop: the history and geology of the park, the opportunity to get advice from the park rangers, and you can schedule a ranger-led tour through the Fiery Furnace Trail, one of the top trails in the park. The tours must be booked in advance, so if this is something you want to do, make sure you do this when you arrive. After enjoying the sunset, head back to camp and prepare all your day hiking essentials for day two.
- UTAH NATIONAL PARKS ROAD TRIP ITINERARY TIP: To save a TON of money on entrance fees, purchase an America The Beautiful Park Pass. It’s an $80 card that gets you into all of the National Parks in the country, plus other recreational areas for a calendar year. Since most park fees are $20 per person to get in, this is a STEAL. You can purchase one online, in advance here, or purchase one when you get to the Visitor’s Center.
DAY ONE SUMMARY
– DRIVE TO MOAB
– SUNSET HIKE IN ARCHES NATIONAL PARK (OPTIONAL)
Where To Stay In Moab, Utah
Moab is the cutest desert town nestled right next to Arches National Park. The most budget-friendly option is going to be camping by a landslide. You can camp inside the park at the Devil’s Garden Campground. This is great if you want to save money on gas, be close to everything, and have first-hand access to the park. This campsite fills up FAR in advance, so if you weren’t able to get a reservation here, Sun Outdoors North is my personal favorite campground that is only a short drive away from the park, plus it has showers, toilets, and a pool which is such a nice feature when it’s so hot outside. There are a lot of other camping opportunities for cheaper or free in and around Moab, so make sure you read my guide to camping in Arches National Park to get the full rundown of your options.
If you aren’t camping and want to soak up that sweet A/C, WiFi, and pool access, The Expedition Lodge and Aarchway Inn are both excellent options that are stupidly close to the Arches Visitor’s Center. They are both very unique stays in Moab and are priced very, very well compared to some of the other options in this area. Also, always make sure you browse the Airbnb’s in Moab because you might be able to find something more affordable that’s a lot cooler than a hotel. This will also help support the local community in Moab!
Booking.com
Day Two | Arches National Park
The first full day of exploring on this Utah National Parks road trip is going to be starting on the Devil’s Garden Trail, one of the best trails in Arches National Park. This trail has seven different arches that you can explore: Tunnel Arch, Pine Tree Arch, Landscape Arch, Navajo Arch, Partition Arch, Private Arch, Double O Arch, and the Dark Angel. You’ll be able to see all seven if you hike the full trail with the primitive loop. Only take the primitive loop if you have a bit of hiking experience because it involves cairn finding and some light scrambling. Nothing crazy, but it can be easy to get lost here. You’ll want to take the trail starting at the Double O Arch. This route is much easier than starting just before the Landscape Arch. If you start this trail before 7-8:00 am, you should be done around noon, so pack plenty of water and a light snack to hold you over until lunch. My three favorites arches on this loop are the Partition Arch, Navajo Arch, and Landscape Arch. The Landscape Arch is one of the world’s largest free-standing arches! A huge chunk of the arch fell off years ago, so you cannot get very close to it, but it’s still incredible to see. This is the perfect trail for seeing a lot in one go! If you’re not interested in doing the primitive loop, it brings the total trail mileage down to around 4-miles.
If you finish around noon, you should have worked up quite the appetite on the trail. You can head out to Moab to enjoy lunch, or go back to camp and whip up something awesome. With how hot the desert gets midday, you really want to take this time to take a break for a few hours because it gets BRUTAL out there. If you booked a place to stay with a pool, this is the perfect time to cannonball in there and cool down. Arches National Park is small enough and condensed enough that even with breaking midday, you can see pretty much everything in the park in 2-3 days, so don’t stress if you’re an eager explorer like myself. During this time, you’ll also want to drink lots of water so you don’t dehydrate.
After fueling up and taking a dip in the pool, it’s time to head back into the park to explore a few more trails and viewpoints before ending the day. A good time to head back into the park is going to be around 2-4:00 pm when it begins to cool down if you’re traveling in the summer.
The first stop for the second half of the day is going to be near the entrance to Arches at the La Sal Mountains Viewpoint. From here you’ll be able to see a 360-degree view of the La Sal Mountains, the Three Gossips, Sheep Rock, and the Organ.
The next two stops are also viewpoints: Courthouse Towers and Petrified Dunes. You’ll see a variety of large rock formations at the Courthouse Towers, and the petrified dunes are an interesting geological phenomenon. This area of the park was once covered in large sand dunes caused around 200 million years ago. Winds from the northwest carried sand into this area to form the dunes, but over time the dunes were covered in other layers of sediment that were compressed by quartz and calcite into Navajo Sandstone, a common rock in all of Utah’s Mighty Five. These are great spots to grab photos, and the Courthouse Towers area is STUNNING around sunrise and sunset if you want a nice photo opportunity.
Heading back onto the trails, your next stop is the Balanced Rock Trail. This is another popular rock formation in the park, even if it’s not an arch! The 3,600-ton rock is labeled as “balanced”, but it’s actually attached to the eroding rock column beneath it. Eventually, the rock is going to fall after so much erosion shaping the landscape. This formation is more than 100-feet high and can be seen at all angles along the trail. This is more of a leisurely walk than a hike, but the views stay serving!
After you finished up at Balanced Rock, you’ll be hitting your next-to-last hike of the day to the Sand Dune Arch, Broken Arch, and Tapestry Arch. This 3-mile trail is easily navigated and only has around 300-feet of elevation gain, so it’s to the point and a perfect stroll this time of day. You can make this trail shorter if you’d like by skipping the Tapestry Arch and only seeing the first two, but I don’t recommend it because these are three very incredible arches that you can walk right up to.

Fill up your water, grab a snack, and prepare for the final hike of the day, and my personal favorite hike in Arches National Park, the Tower Arch Trail. I’m not sure how this trail ended up as the red-headed stepchild of Arches, but you MUST get out here to see the sunset in this spot. You’ll likely only be joined by a few others on this trail for the full three miles, so this is the perfect place to avoid crowds and get a seriously awesome view all to yourself. This trail is primitive, so make sure you watch for cairns carefully, especially on the way back you’ll need a headlamp. I have an in-depth trail guide you can read here before you head out as well!
Head back to camp after seeing probably one of the best sunsets on your trip, enjoy a nice dinner, and get ready for tomorrow’s epic day of exploring.
DAY TWO SUMMARY
– LA SAL MOUNTAINS VIEWPOINT
– COURTHOUSE TOWERS VIEWPOINT
– PETRIFIED DUNES VIEWPOINT
– SAND DUNE AND BROKEN ARCH LOOP
Day Three | Arches National Park
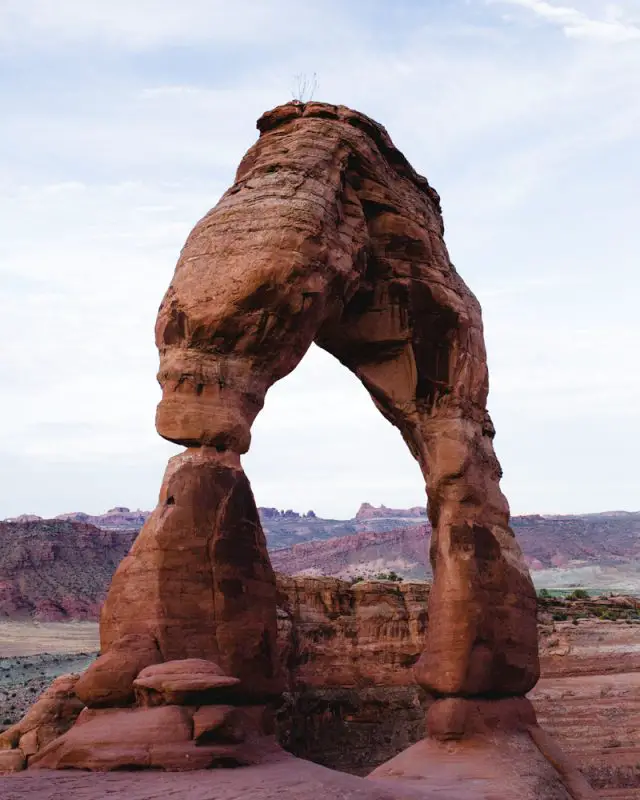

Your second full day in Arches National Park is going to start with none OTHER than the Delicate Arch Trail. Since you’ve been in Moab for a few days with this trail looming, you’ll be stoked to get out and finally know what all the chatter is about this hike. I recommended hiking here in the morning since there are fewer people trafficking the trail and so you’ll get more of the arch to yourself, but it is just as good, if not better at sunset. Once night hits, you’ll be able to see the milky way, so if you want to do some stargazing then plan to do this hike last on this day, just don’t forget your headlamp. The trail is very straightforward and well-marked so you shouldn’t have any trouble getting around. Pay close attention to arrows on the rock, cairns, and signs along the way to guide you in the right direction. If it’s raining or the weather is bad, you definitely want to wait for better weather because the trail can be very dangerous in these conditions. There is a portion of the trail that is slickrock, which is, you guessed it, very slippery when wet. Other than that, the trail is very straightforward from there. The trail continues to climb and then levels out a bit before you reach the arch. The last little bit you’ll be walking along a rock ledge (entirely safe). Once you reach the top, grab a spot and soak it in! It’s a lot bigger than you think!
Once you hike back down from the Delicate Arch, a short walk from the trailhead is the next stop, Wolfe Ranch. Centuries ago, the Zuni, Hopi, Ute, Paiute, and many other American Indian tribes traveled and camped through this area. These tribes were highly educated about the nearby resources of this area like wild game and water sources, despite not living here year-round. During the times they settled here, the Ute tribe etched in images of their tribe and horses on the rocks close to the cabin from 1650-1850. These are the petroglyphs you’ll be able to see on the Wolfe Ranch and Petroglyph Trail. The cabin was built and settled by John Wesley Wolfe and his son Fred after he experienced a civil war injury and sought after a drier climate. Their story is quite interesting since they were here around the same time as the Ute Indians and were able to trade goods with them! The trail around this area isn’t very long. Coming down from the Delicate Arch Trail, on the right-hand side, you’ll be able to spot the trail that will take you to the rock carvings.
If you finish early enough at the Delicate Arch, the next stop is Panorama Viewpoint before you join your ranger-led tour of the Fiery Furnace. Make sure you grab permits for later in the day so you can rest after the Delicate Arch. From this viewpoint, you’ll be able to see the Devil’s Garden, the Fiery Furnace maze, the La Sal Mountains, and a 360-degree view of Arches National Park. This is a great pit stop to drink some water and enjoy a snack before you the next trail. Once you’re finished up, head to the Arches National Park Visitor’s Center to meet up with your ranger.
The Fiery Furnace Trail is a hike that you definitely don’t want to miss while you’re in Arches. If it’s your first time in the park, I don’t recommend trying to navigate this by yourself. The trail is a maze with plenty of off-track footprints that can lead you in the wrong direction, so definitely plan ahead and schedule a ranger-led tour. They run from May 1st – September 26th, and you can prebook a 9:00/9:30 am time slot or grab a spot for a later time in person. You have to arrive at the visitor’s center an hour before you’re scheduled to hike out, so if you’re hiking to the Delicate Arch this morning, you’ll want to book something a little later in the day, otherwise, you’ll be crunching on time. It’s $10-16 a person, depending on the tour you choose. There is a ton of helpful information here to get you better informed about what you can expect.
About the time you finish up in the maze, it’s getting around the time to break for lunch at camp or in Moab. Put that pool to some good use, reapply your sunscreen, and head back out to finish up this day. The days leading up here have been fast-paced, and these last trails are very chill, so if you want to relax for a bit longer and explore more of Moab, you have plenty of time to do so, and I highly recommend it!
Your last full day in Moab and the morning before you drive to Canyonlands can be spent two different ways: sunset walk around the Windows Section/Double Arch and sunrise hike to Corona Arch, or sunset hike to Corona Arch and morning walk around the Windows Section/Double Arch. It really depends on what type of difficulty you’re wanting for the rest of this day. For something chill, go to windows, for something challenging, go to the Corona Arch.
If you’re going the chill route, head over to the Windows Loop and Turret Arch Trail. On this loop, you’ll be able to see three different arches: North Window, South Window, and the Turret Arch. The trail is relatively flat and straightforward, much like the Double Arch so you can take your time here and enjoy the area. This part of the park gets very busy this time of day, so if you want to avoid crowds, you can always revisit this area in the morning before you go to Canyonlands, if you don’t want to see the Corona Arch. Next, you’re going to head to one of my favorite arches in the park, the Double Arch Trail. This is one of the most popular hikes in the park because it is both beautiful and easily accessible. It’s only a short walk from the parking lot and you’ll be able to see the arches from the trailhead. The total trail length is a little over half a mile there and back and gains basically no elevation. This is the perfect stroll for sunset since you can climb into the arch and watch the sun go down over the park.
The Corona Arch Trail is one that I missed while on my Utah National Parks road trip, so I am passing along this gem so that you don’t. This arch is not inside Arches National Park, it’s around 20-minutes outside of Moab, but it’s known for being one of the best hikes outside of Arches National Park! It is best hiked for sunrise since the afternoons can get busy, but sunset would be MAGICAL here, especially if you brought your camera. It’s a 2.4-mile out-and-back trail that is moderate to difficult, but highly rewarding. Along the way, you’ll also spot the Bowtie Arch! This is also an ideal hike to do instead of the Fiery Furnace if you’re looking for a good alternative.
Once finished up at either of these areas, head back to camp and prepare for the next stop on your Utah National Parks itinerary, Canyonlands National Park! While you’re still in the park, feel free to stop at any leftover viewpoints you have to explore.
DAY THREE SUMMARY
– PANORAMA VIEWPOINT
– FIERY FURNACE TRAIL (OPTIONAL)
– CORONA ARCH TRAIL (OPTIONAL)
Day Four | Drive To Canyonlands National Park
– Sunrise hike in Arches National Park, then drive and explore Canyonlands National Park.
– DRIVETIME | 30-40 minutes
RECOMMENDED PIT STOP (OPTIONAL)
Before I tell you to drive directly to Canyonlands, there is an amazing opportunity to explore a Utah State Park on the way. State Parks often do not get the recognition they deserve, and Dead Horse Point State Park is left shadowed by Utah’s Mighty Five. This pit stop only adds an additional 30-minutes to the rest of your itinerary and it’s well worth going, even if you just stop by for some photos! Two trails I recommend are the Dead Horse Rim Loop Trail, if you don’t mind the hiking time, or if you want something short and sweet, the Dead Horse Point State Park Short Loop Trail serves similar views for a fraction of the distance. If you can manage to make it to either of these views for sunrise, it’ll make it even more epic and boast PERFECT lighting *chefs kiss*.
Whether you’re stopping at Dead Horse or going directly to Canyonlands, if you happen to be looking for a campsite outside of Canyonlands, the Horsethief Campground is an awesome BLM camping spot near the park. Snag this on your way so you don’t have to worry about finding camp later.
Once you do get to Canyonlands National Park, there are so many breathtaking hikes to explore for the afternoon. The trails that I am recommending are going to be in the Island in the Sky and Needles Districts of the park. There are three different districts in total: Island in the Sky, the Needles, and the Maze. A lot of the highlights of the Island in the Sky District can be seen in a day, so for the second full day in the park, you’ll be exploring the Needles District via a few really incredible trails. If you’re not interested in spending time in this district, you can opt to spend the day in Dead Horse Point State Park instead or extend your time in the Island in the Skye.
The rest of this day is going to be spent driving the Grand Viewpoint Road while hitting a couple of trails along the way: Murphy Point, Upheaval Dome, White Rim Overlook Trail, and the Grand Viewpoint Trail. Once you get into the park, make sure you stop at the Visitor’s Center to fill up all your water bottles. This is the only place in the park that you can get it and you’re going to want to stay hydrated. Not just for this park, but for this whole itinerary. WATER. WATER. WATER. And sunscreen.
Once prepped, hop back in the car and head to the Grand Viewpoint Overlook. You can see the main focal point from the viewpoint itself, but when you take the trail you walk along the canyon edge and arrive at a beautiful location overlooking the canyon. There is basically no elevation gain, so you have a nice leisurely stroll to start your day. This hike gives you that “we’ve arrived!” feeling that I love. There’s just something about that first hike in a National Park that feels extra special. On top of all that, at the end of the trail, it is so quiet, so you can take everything in and enjoy some silence. The view reminds me of a giant dino footprint, or something similar!
The next stop is right next door at the White Rim Overlook. It’s called “white rim” because this part of the canyon has, you guessed it, a white rim. It’s different from the previous overlook and unique enough to where it’s not redundant. It’s almost 2-miles roundtrip, another leisurely stroll, with rewarding views at the end. From here you’ll be able to see the White Rim Road, a 71.2-mile-long road that traverses across the white rim sandstone. This road was made in the 1950s by the Atomic Energy Commission to give miners access to uranium deposits during the Cold War. The intent was to mine the deposits for nuclear weapons, but this area produced very little and the mines were abandoned. This road is mainly accessible with a 4×4 car and you can drive the entire road in 2-3 days!
One of my favorite trails in Canyonlands National Park is the Murphy Point Trail. This area is the most beautiful during sunset, but there is a better location we’re going to at the end of the day, so if you can make it here in the late afternoon, the views will be a little bit better. Like the previous two hikes, this is another leisurely jaunt around the canyon. It’s 3.4 miles out and back but it can be hiked quick since there is relatively no elevation gain. It starts in a grassy field, then the canyon will bloom open on your right side, then expand to a panoramic view at the end. I went here for sunset and my friend and I were the only two people here! It’s another quiet spot in the park, which is sometimes hard to come by these days.
For the latter half of the day, your first stop is at the Buck Canyon Overlook. I mentioned above that the White Rim Road was made for uranium mining and at this overlook, you can see some of the remnants of those mines. It shows you just how fragile the desert ecosystem is since the land hasn’t recovered in over seventy years. Most of the Island in the Skye “hikes” are leisurely strolls, and this is another one that is short and sweet, but we’ll end the day with a more challenging trail.
Something that I never expected to see in Canyonlands National Park was a 3-mile wide impact crater that formed over 60-million years ago. There is so much speculation and controversy as to how Upheaval Dome formed so long ago. Some scientists say it is the remains of a salt dome, others say that it is from the impact of an asteroid. I rolled with the second since that sounds a lot cooler, but you can read more about each of the theories here. The trail is pretty straightforward with a mile climb up to the first viewpoint. Recently they changed the location of the second overlook and changed the trail, but you definitely want to go to the second overlook for a better view of the dome. It’s a more difficult hike to get up there, but nothing crazy. You’ll also see a fraction of the people here!
To wrap up the day, we are going to NONE OTHER than the Green River Overlook, probably the most beautiful spot in the park for sunset. For this being just an overlook, you would think that you would need to hike nine miles through the most remote part of Canyonlands to see a view like this but it’s right off a PARKING LOT. UNBELIEVABLE. I made the mistake of coming here for sunRISE thinking it would be the same experience… not at all! Make this one a sunset mission!
After the sun goes down, head back to where you’re staying, chow down on a nice dinner, and prepare to visit the Needles District tomorrow!
DAY FOUR SUMMARY
– PIT STOP AT DEAD HORSE POINT STATE PARK (OPTIONAL)
– DRIVE TO CAMP / CANYONLANDS NATIONAL PARK
Where To Stay Near Canyonlands National Park
Since Canyonlands is so remote, Moab is the nearest town that you can stay, unless you’re camping. If you’re camping you can stay inside the park at the Island in the Sky (Willow Flat) Campground if you can get a reservation, otherwise, your best bet is camping nearby at Horsethief Campground. Those sites are on a first come first served basis so get there a little early to snag a good spot. Otherwise, as I mentioned above in the Arches portion of this Utah National Parks road trip, there are many great spots to stay at in Moab that you can browse below, or stay at my favorite campground in town, Slickrock. The downside to staying in Moab is all the extra gas you’re going to need to drive to and from the park for a few days, so keep that in mind as well if you’re traveling on a budget.
Day Five | Canyonlands National Park
Today you have a couple of different options since there is some variety in this area. You have the choice to explore the Needles, which is what we’ll be chatting about. You can spend this day in Dead Horse Point State Park, or opt for extra time in the Island in the Sky District. The trails in the needles are more challenging and longer, but extremely rewarding, but keep your experience level and comfort in mind.
Since the trails are longer, you won’t be able to hit as many within this day but to start you have two different options: Druid Arch Trail or the Chesler Park Loop Trail. The afternoons become hot very fast here, so you want to aim to start these as early as possible to beat the heat and also to get a parking spot.
The Druid Arch Trail is a 10.5-mile out-and-back trail that takes most hikers around six hours to complete. Ideally, you’ll want to start this trail around 6:00 am so you can beat crowds and get a parking spot. This trail is rated as moderate and you MUST pay attention to the cairns along the way so you don’t get lost. If you don’t see a cairn for a while, you’ve likely gone the wrong way and need to backtrack. Having a map that notes key intersections on the trail is crucial, so make sure you download the Hiking Project or All Trails App. One place a lot of people get turned around is taking a turn onto the Chesler Park Trail. If this happens, you can continue on the trail and it loops back around to Elephant Hill and adds roughly 45-minutes to your hike. However, if you have a map and notate where trails intersect, you’ll be fine. For trails like these, I definitely prefer the Hiking Project App since it saves your GPS location offline (for free) and you can use that to see what direction to go in.
The other option is the Chesler Park Loop Trail. Similar to the Druid Arch, this trail boasts some of the most diverse landscapes in Canyonlands National Park. Druid Arch has more of an “arrival point” with the arch whereas the Chesler Park Loop offers views the whole way and you’re not necessarily looking for something specific. Neither is a bad choice, it’s just based on preference since they’re similar in terrain and difficulty. You’ll want to get here early for a parking space since there are going to be a lot of people getting there early to either beat the heat or find a camping spot for their backpacking trip.
Once you’re finished with either of these trails, you’ll want to take a nice afternoon break to fuel back up, drink some water, and prepare to head back out for the remainder of the day. There are a few overlooks you can park at that are great for chilling in the car and enjoying some A/C: Big Spring Canyon or Wooden Shoe Arch Overlook.
For the remainder of the day, you have a few options. You can either hike another moderate trail, depending on what you chose for this morning: Chesler Park Loop or Druid Arch, or you can opt for something easier like the Slickrock Foot Trail. If you choose to tackle the more difficult one, make sure you have plenty of daylight hours to do so and bring a headlamp. It’s going to be easier to get lost if you’re hiking in the dark since you need to look for cairns so keep that in mind.
The trailhead for the Slickrock Foot Trail is right next to the Big Spring Canyon Overlook. This trail has little to no elevation gain, cairns that are easy to spot and navigate, and views for the entire 2.4 miles. It’s a fun trail to explore and walk out to the various viewpoints along the way. This is the best short hike in this district, but it’s not anything that’s going to blow you out of the water. It’s great to wrap up the day with something short and sweet to prepare to drive to Capitol Reef National Park tomorrow.
DAY FIVE SUMMARY
– DRUID ARCH TRAIL or CHESLER PARK LOOP TRAIL
– BIG SPRING CANYON OVERLOOK
– WOODEN SHOE ARCH OVERLOOK
Day Six | Drive To Capitol Reef National Park
– Explore some trails in Island in the Sky for sunrise, then head to Capitol Reef National Park.
– DRIVETIME | 2.5-3 HOURS
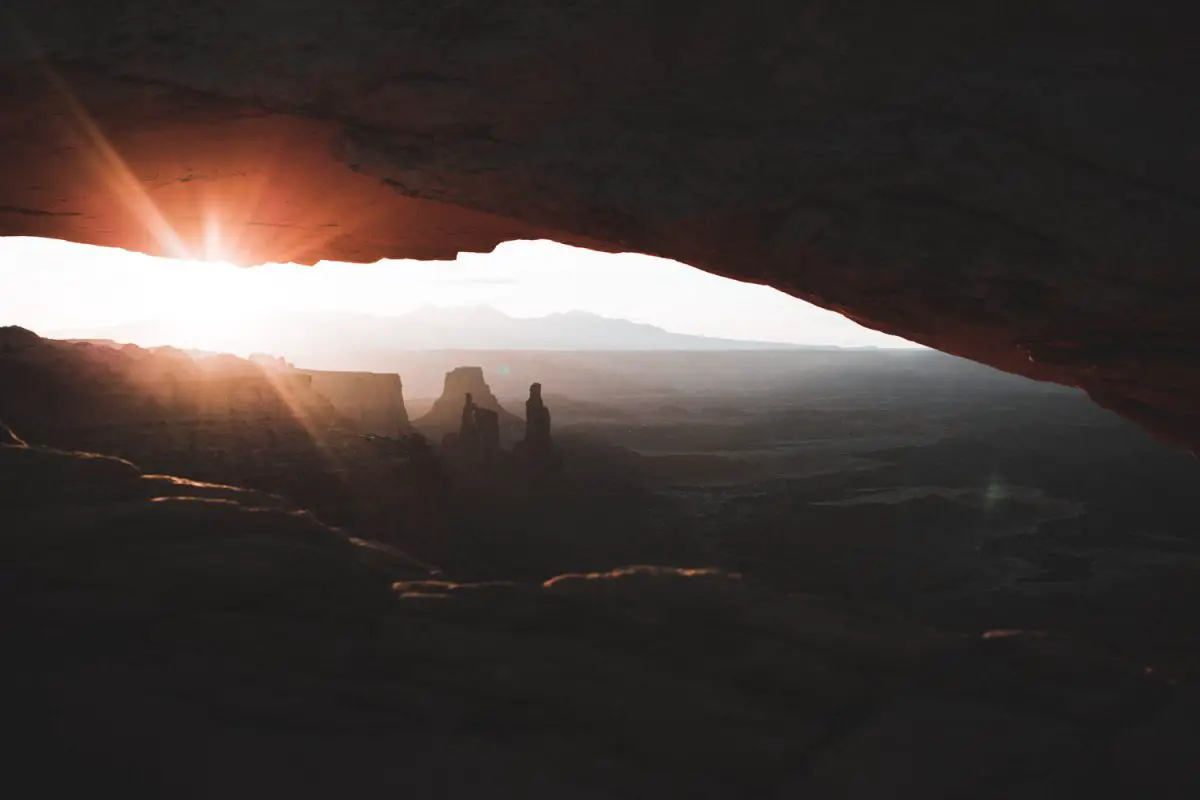
Before you drive to Capitol Reef National Park, you’re going to be visiting NONE OTHER than the Mesa Arch. This is the most iconic view in the park, and therefore the busiest. Unless you’re visiting in the absolute dead of winter, you’re going to be joined by LOTS of people here, no matter how early you arrive. This is one of those things that you’re going to have to go in with a good mindset. There are going to be dozens of photographers posted up with their tripods eager to get a photo, plus the many people trying to squeeze in for a good view. Although it’s busy, there are really few things more magical than seeing the sun come up over the canyon and through the arch. It’s SO beautiful. The trail here is a nice walk and a little over half a mile, making it a quick pit stop for the morning. For a better view and fewer crowds, there is a place above the arch on the left side that you can scramble up to get an unobstructed view over the canyon.
- UTAH NATIONAL PARKS ROAD TRIP ITINERARY TIP: On transit days where you’re driving from one park to another, is a great time to take advantage of a sunrise mission! Some trails are best explored in the morning hours. Try to tackle busier trails on these days to avoid crowds!
If you want to squeeze in just one more short trail before heading out, the False Kiva Trail is a WINNER. This 2-mile trail takes you to a manmade stone circle situated in an alcove overlooking Canyonlands National Park. The trail isn’t well-maintained, so make sure you bring a map and keep on the lookout for cairns along the way. Due to vandalism, the alcove at the end is closed, but you can still take in the view at the end and along the way. The first 2/3 of the trail is a nice stroll, but the last 1/3 can get tricky with a steep climb down, then up on the way back, but it’s worth the effort for the final view.
By the time you’re finished with one or both of these trails, you should be ready to head to Capitol Reef National Park. From the Island in the Sky Visitor’s Center, it’s around a 2.5-hour drive through Hanksville to get to the Capitol Reef Visitor’s Center. Along the way, you have the option to stop at Factory Butte for a sweet view. You’re likely not going to have service going through Hanksville, but we stopped at one of the gas stations in town and a nice local woman gave us directions to the butte. Sometimes when I plan road trips, a lot of cool “in-between” spots are left off itineraries, so I want to give you the 411 so you have the option to see something sweet. With the length of this Utah National Parks road trip itinerary, it gives you a full day of exploring Capitol Reef, which is more than plenty of time, so take your time on this chunk of time if you wish!
To avoid backtracking, the next pit stop is for those of you that rented a 4×4 car with high clearance, the Temple of the Sun and Moon. This part of Utah has gained just a little bit of popularity recently in media, but it’s still low-profile enough for you to have this spot basically to yourself for sunset. This is an expansive area with three distinct rock monoliths that make for beautiful photos this time of day. The road here is impassable when wet and should not be attempted in a regular car because you may get stuck. Also, camping here is prohibited, so go to the Cathedral Valley Campground to camp in this area for the night.
If you don’t have a 4×4 car, head straight to the Capitol Reef National Park Visitor’s Center to grab a map and get exploring.
DAY SIX SUMMARY
– FACTORY BUTTE (OPTIONAL)
– TEMPLE OF THE SUN AND MOON (4X4 CAR ONLY / OPTIONAL)
Where To Stay Near Capitol Reef National Park
Unless you’re camping inside Capitol Reef National Park at the Fruita Campground, you’ll need to snag a spot in Torrey, Utah. The best camping alternative to camping in Fruita is the Wonderland RV Park. Out of all the campsites I stayed at on my Utah National Parks road trip itinerary, this was BY FAR my favorite. It makes you feel like you’re transported back in the 80s on a good old-fashioned family road trip. The tent sites are plotted on the PLUSHEST grass, there are showers, toilets, and even wifi. If you’re going to the Temple of the Sun and Moon, stay at the Cathedral Valley BLM Campground. This is going to be a much shorter drive than going all the way to Fruita if you got a reservation or Wonderland RV Park.
Day Seven | Capitol Reef National Park
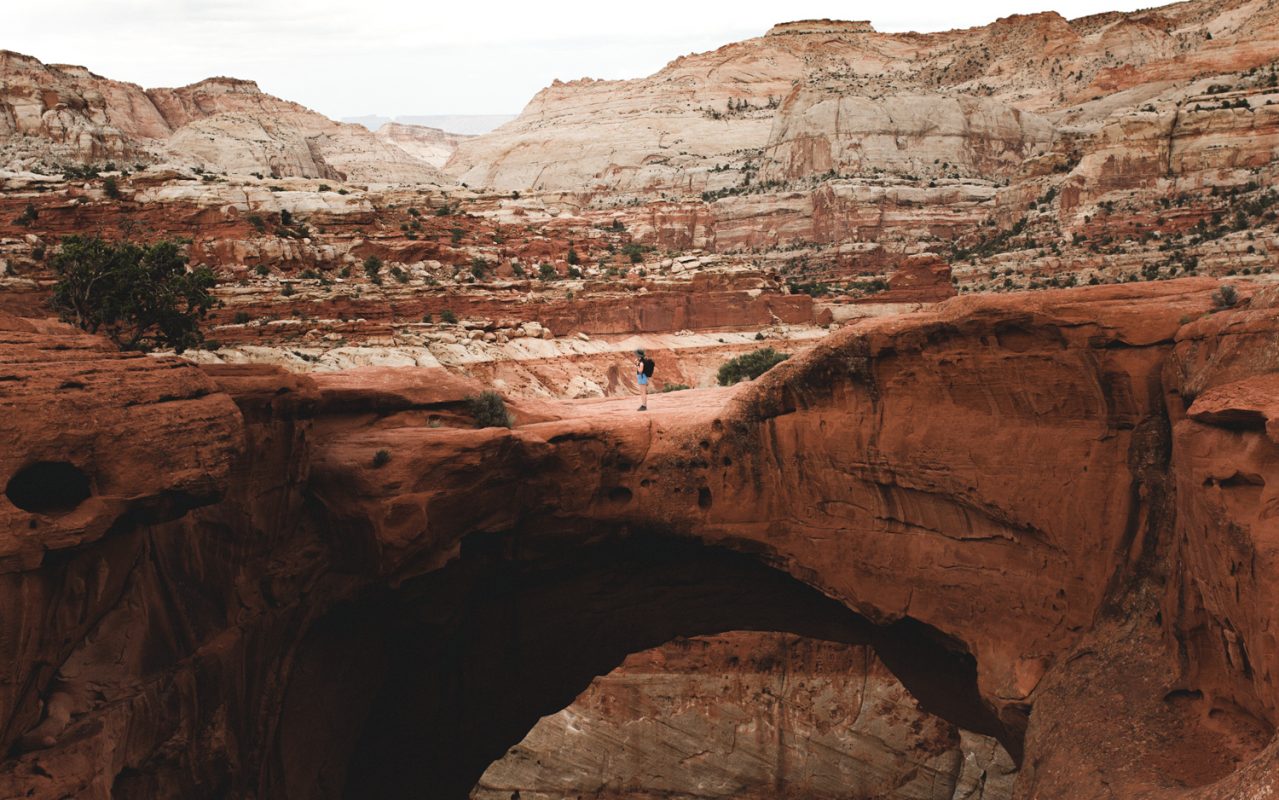
For your first full day in Capitol Reef National Park is going to be hiking the most beautiful trail in the park, Cassidy Arch. Since Capitol Reef is never talked about, I wasn’t expecting much from this trail, but WOW. It’s not too long, just challenging enough, and you’re going to be surprised at how incredible the view is. Instead of looking up into the arch like most of the hikes in Arches National Park, you’re looking down into it while standing on top of a cliff. PRETTY SWEET. The trail is around 3-miles long and is accurately rated as moderate. However, it was a bit more challenging than I expected. It’s a pretty hefty climb to get there and I would say it’s more difficult to get here than it was the Delicate Arch. The trail is well-marked with cairns and near the end, you’ll be walking across the slick rock to the final view above the arch. Before you head out, be sure to check an accurate weather report because the road here floods very easily and the trail becomes very dangerous. Even check the weather in the area because the water will flood into the canyon. Read my full guide to hiking Cassidy Arch here!
Head back down and head over to the Hickman Bridge Trailhead. This is another trail with a view that characterizes Capitol Reef National Park. This arch soars above the Fremont River and is surrounded by cliffsides of Navajo Sandstone! Long ago, the bridge used to be over running water through this area, but now it is a dry wash. The trail is a little bit under 2-miles and considered moderate. There are a few good climbs throughout the trail, but overall, it’s a nice walk over to see the bridge. One detail I like about this trail is that it features A LOT of history of the part throughout the walk. At the trailhead, there is a brochure you can grab that will point out 17 different points along the trail that note the cultural and human history of the area. You’ll be able to spot Fremont pit houses, elevated granary, and the Fremont River Valley where the Fremont people prospered for generations in this part of Utah.
After spending the morning hitting the trails, it’s time to head for the cult-favorite destination in Capitol Reef National Park, the Gifford House. This is not a hike, but instead something JUST AS GOOD, if not better, a nice stop to enjoy pies and coffee in the Fruita Valley. This is the only food option in the park, so I recommend bringing a lunch this day AND having pies for a sweet treat to help keep you fueled. Nothing beats a little sugar rush before you head back out exploring! The Gifford House or homestead was built in 1908 by Calvin Pendelton. The area is described as “a sudden, intensely green little valley among the cliffs of the Waterpocket Fold, opulent with cherries, peaches, apples, and settled by a few Mormon families and farmers”. Today, the homestead has been converted into a little shop (where the pies are) where you can buy kitchen supplies, food, quilts, rugs, and tons of other home items.
From the homestead, head across the street to the Capitol Reef Petroglyph Trail. This is a nice trail to get back out after lunch since it’s short and flat. There are stops along the way where you can use telescopes to spot some petroglyphs. Boards along the way will give you the history of the area and where the etchings came from. If you have your own binoculars, this is a great trail to whip them out on!
The Capitol Reef Scenic Byway is one of the best things to do in Capitol Reef to take in unique geological structures inside the park. The entire drive is around 8-miles and you don’t need any special 4×4 car to complete it. In total, this drive takes around an hour and a half to complete if you include two side roads, Grand Wash and Capitol Gorge. The road starts by the Visitor’s Center and continues down Camp Road, which merges into the Scenic Drive. At this point, you’ve already driven Grand Wash to hike Cassidy Arch, so you can skip that road and go straight to Capitol Gorge. The eleven unique stops on this byway feature wide views of the park’s geology, old archaic remains, vegetation, and natural phenomenon. The National Park Service (NPS) has a full guide on driving the Capitol Reef Scenic Byway that you can read here!
After returning back to the Visitor’s Center turn right and head towards the Grand Wash Trailhead. This hike is very flat and straightforward, so it’s a ton of fun hiking through the narrow slot canyon along the dry riverbed. I love hikes that still serve views, but aren’t extremely exhausting! The trail ends at the Cassidy Arch Trailhead, so you could technically combine these two hikes in the morning by driving to the Cassidy Arch Trailhead, hiking to the arch, then hiking out and back through the wash. This way you won’t need to go and pick up your car anywhere. This will also help save time this day!
Since the day is pretty packed with trails, the Chimney Rock Loop Trail is optional, or if you want to swap another trail this day with this one that works too. The Sulphur Creek Trail is another really nice option to look into as well that’s nearby and a little easier! The trail is around 3.3-miles and rated as moderate. I recommend doing the hike in a clockwise direction so that you can break up the elevation gain and offer better views. Chimney Rock is one of the quieter trails in the park compared to The Hickman and Cassidy Arch, so you won’t see near as many people! Others have recommended doing this hike to see the sunset, so you can opt to spend sunset here instead of at the two next overlooks.
Sunset Point and Goosenecks Overlook are two amazing spots to see the sunset in Capitol Reef National Park. You could have guessed since the name hints at it anyway! This is a 2.5-mile, easily hiked trail to see two viewpoints that showcase the diversity of Capitol Reef with the layers of red Windgate sandstone, Kayenta formations, and the infamous Navajo Sandstone that you’ll be immersed in through the entirety of your Utah National Parks road trip itinerary! At the beginning of the trail, you have the option to take a short detour to Panorama Point, otherwise, the trail connects to both the viewpoints as an out-and-back trail.
Enjoy the warm orange tones illuminating the view, then head back to camp and prepare for the next National Park on this Utah road trip, Bryce Canyon National Park.
DAY SEVEN SUMMARY
– PIES AT THE GIFFORD HOUSE
– CAPITOL REEF PETROGLYPH TRAIL
– CHIMNEY ROCK LOOP TRAIL (OPTIONAL)
– SUNSET POINT / GOOSENECK OVERLOOK
Day Eight | Drive To Grand Staircase-Escalante
Another amazing place in Utah that flies under the radar is the Grand Staircase-Escalante National Monument. This is a MASSIVE recreational area with some really epic hiking, backpacking, and climbing opportunities. You’ll be exploring a few trails here, but these two are the main highlights: Zebra Canyon and Lower Calf Creek Falls.
In the morning, head out to the Singing Canyon. Before you go, you need to do a little bit of backtracking and stop at the Calf Creek Campground first if you’re camping, to ensure you get a spot for the night. The spots are on a first come first served basis, so if you arrive later in the day, you may not get a spot and you definitely don’t want to do that because camping is very limited in this area. Grab a site, then head to the canyon.
The road to get to Singing Canyon isn’t paved and has quite the washboarding, so take it slow and it’ll take you around 45-minutes to get to the canyon. This isn’t a hike, but it takes you in between canyon walls that are around 80-feet high with deep orange, red, and purple tones. The canyon is known for its acoustic abilities, so some people come here with music or instruments to hear the canyon sing! The area is entirely shaded, so it’s nice if you’re traveling here when it’s hot outside, which you probably will be.
The Devil’s Garden Trail is one of the best, easily accessible hikes in Grand Staircase-Escalante. It’s one of the most diverse trails in the area considering it has arches, hoodoos, and a variety of other geological formations. No matter what your age and physical abilities are, you’re going to enjoy this trail, probably a lot more than you’re expecting! It’s a nice, mile stroll and a nice place to enjoy a late breakfast or early lunch.
After this, head over to the Zebra Tunnel / Canyon Trail. This is a 5.5-mile, moderately rated trail that takes you through a striped slot canyon that is a little bit similar to the infamous Antelope Canyon near Lake Powell. This is an optional hike for a few reasons. First, the canyon may be filled with knee-to-waist-deep water and I know some people may not be comfortable doing that. Second, some say the trail isn’t worth it since the majority of the trail is underwhelming until you get to the main part of Zebra Canyon. This trail really depends on your comfort levels and the weather forecast because this becomes EXTREMELY dangerous in bad weather or flash floods. If you go, make sure you have an offline map downloaded and GPS since there are some areas where the trail spurs off. The reviews on All Trails (linked below) will give you many people’s first-hand experience to help you gauge and this is a good video for reference.
The last trail of the day, Lower Calf Creek Falls, is plopped nicely right next to the campsite, so after you finish this trail you can immediately chill and wind down for the night. This is a perfect late afternoon hike when the weather is at its peak because the end of this trail has a small waterfall and pool to swim in once you reach the end. While the trail here is almost 7-miles long, there is barely any elevation gain, so you should be able to complete this in around three hours, not including the time you spend dipped under the falls. Since you’ll be camping on BLM land this night, this is going to feel nice getting all the sweat and dirt off of you!
DAY EIGHT SUMMARY
– ZEBRA CANYON TRAIL (OPTIONAL)
WHERE TO STAY NEAR ESCALANTE
The camping in Escalante is pretty sparse, so you only have a few options for campsites: Calf Creek Campground, Deer Creek Campground, or the Wide Hollow Campground in the city of Escalante. The BEST option is going to be Calf Creek because it’s the only site that won’t require you to drive out of the way for hikes and it’s right on the main road. Deer Creek is down Burr Trail road, which is the same gravel, washboard road you take to get to Singing Canyon, and Wide Hollow is all the way in Escalante, 45-minutes out, so get a spot at Calf Creek if you can for ease and to save gas.
Other accommodation options are all going to be in Escalante since this part of Utah is pretty remote. The Ponderosa Inn, Canyons Bed & Breakfast, and the Slot Canyons Inn are all really nice, affordable options in the area. The Canyons Bed & Breakfast is by far the best bang for your buck. The property is a historic, 1905 pioneer home with the best breakfast in the area. Danny and Julie are warm, welcoming hosts that can answer all your questions about hiking in the area, and give you great recommendations if you’re looking for more options!
Day Nine | Drive To Bryce Canyon National Park
– Drive to Bryce Canyon National Park and explore the main trails.
– DRIVETIME | 2.5 HOURS
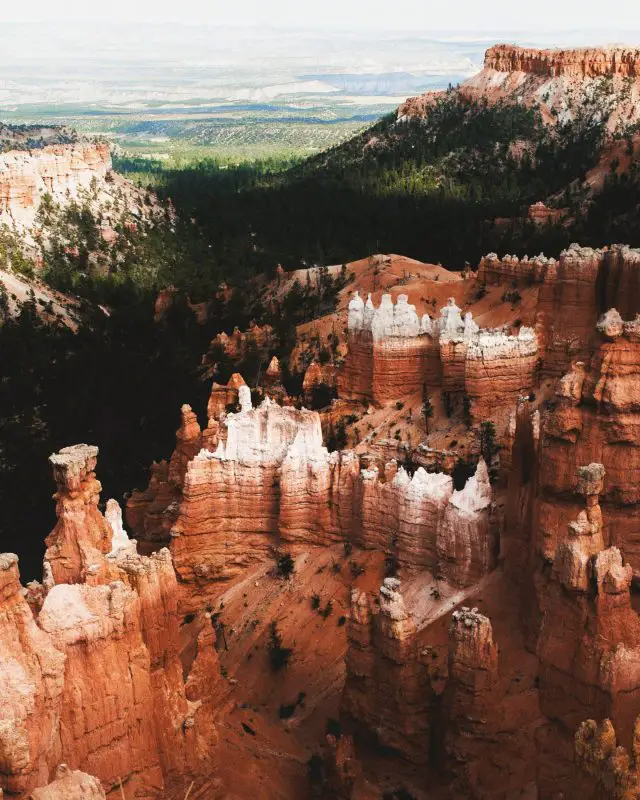
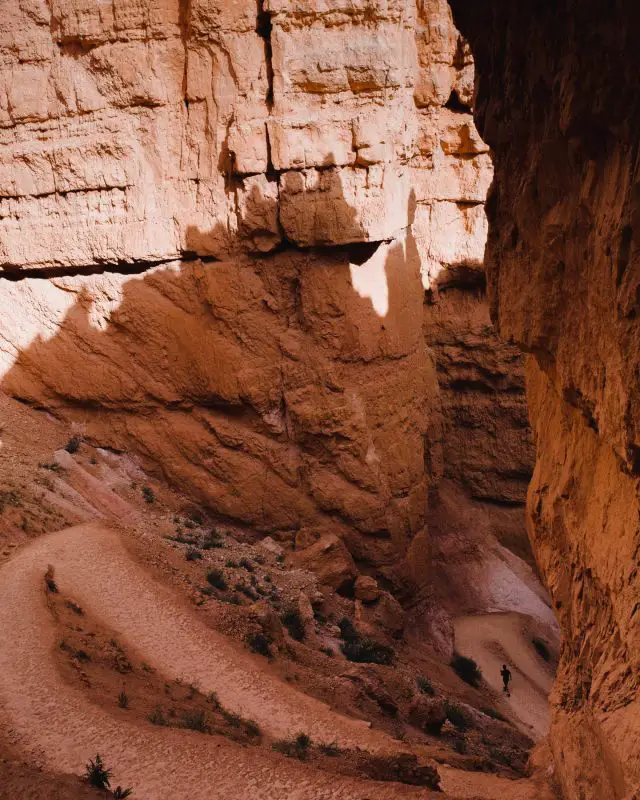
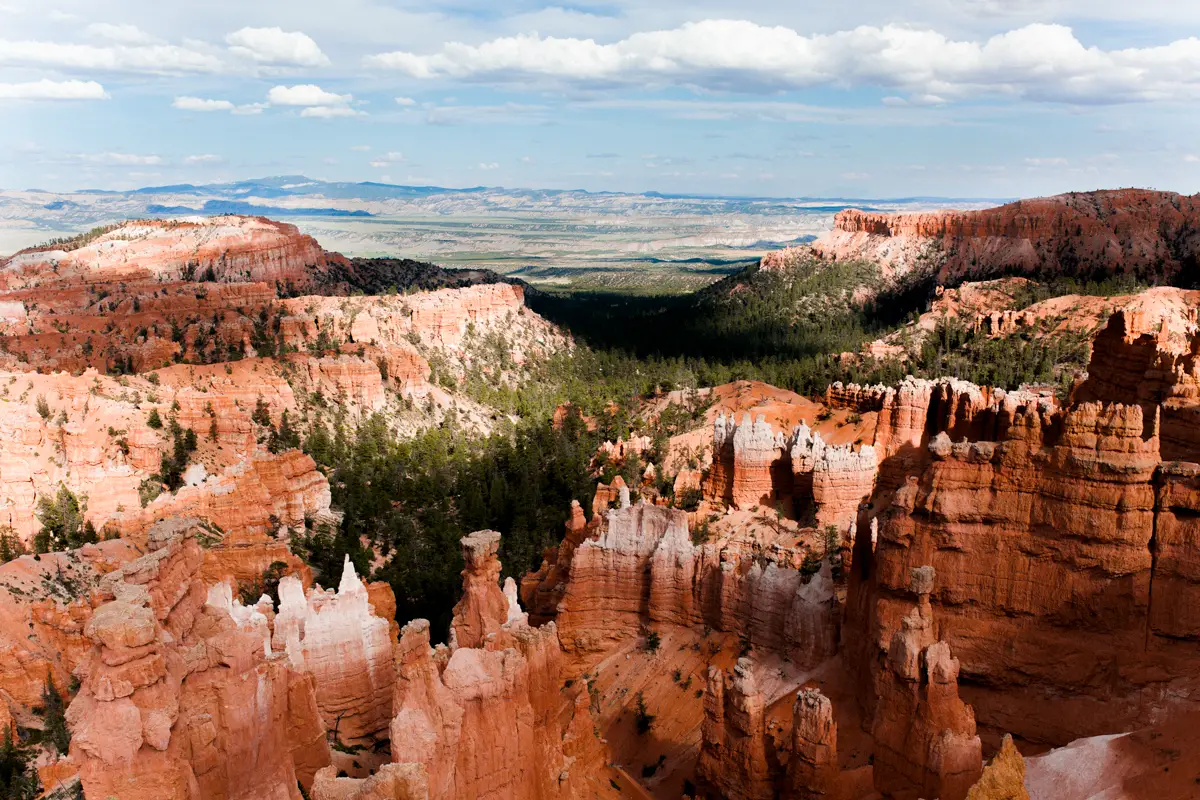
Your first day in Bryce Canyon National park is going to start at Inspiration Point. Ideally, make it for the sunrise if you want to wake up that early! You’ll see dozens of hoodoos here and that first morning light makes for the BEST photos! From here you’ll be able to hop on your first trail of the day, so pack breakfast and watch those golden rays filter through the canyon!
One thing I LOVE about Bryce Canyon National Park is that it has excellent public transport and almost all of the trails in the park are interconnected, so you can mix and match trails and see so much in a short amount of time. For today, you’ll be combing the Peek-a-Boo Loop, the Queen’s Garden Trail, and part of the Rim Trail.
Start the hike at Inspiration Point, then go right towards Liberty Castle and the Peek-a-Boo Loop Trailhead. At the main trailhead, you’ll be able to hike out to Bryce Point. This is a beautiful viewpoint that gives you a wide view of all the hoodoos in the Bryce Amphitheater. I love this one, but it can be really hard to photograph around midday because of all the casted shadows, so this is a really good alternative stop for sunset. Hike back from the point and then you’re going to come to a fork in the trail, go left. Right leads to the Continental Divide Trail. Bryce Canyon is a VERY well-marked park too, especially where trails connect, so you should have no trouble getting around. From here, you’ll be going north to where Peek-a-Boo and Bryce Canyon meet. Go left at the fork towards the Queen’s Garden, then make a right to get on the Queen’s Garden Trail. This area is at the bottom of the canyon, so it’s a nice spot to sit down and enjoy some snacks for the afternoon in some shade. Just make sure you don’t feed the wildlife.
Heading right on the Queen’s Garden Trail, you’re going to go north towards Sunrise Point. Here you’ll be back at the top of the canyon, so hop on the paved Rim Trail and head to Sunset Point, then on back to Inspiration Point. You also have the option of taking a shuttle from Sunrise Point to Inspiration Point if you don’t want to walk the last little bit. The total mileage for these combined trails is around seven miles total with 1600 feet of elevation gain. I recommend packing sandwiches before you head out so that you can enjoy them in the Queen’s Garden before hiking back out of the canyon. This entire hike should take you 4-5 hours!
This is an ideal combination of trails because you’ll be hiking the entire Queen’s Garden Loop, Peek-a-Boo Loop, and part of the Rim Trail all in one go! Plus, this takes you back to your car. Starting at the top of the Bryce Amphitheater, you’ll be starting your hike away from the hoodoos, then as you hike down into the canyon, you’ll be up close and personal with the unique orange rock structures, then a lush pine forest at the bottom. It really gives you a FULL rundown of the park, which is why I love this combination so much.
For sunset, Inspiration Point, Sunrise Point, and Bryce Point are all worth going back to via car! Ironically, most people go to Sunset Point to watch, but with the way the canyon is laid out, Sunrise Point has better light this time of day. I’m not sure how the names were backward, but make sure you go to Sunrise instead or one of the other options.
DAY NINE SUMMARY
– QUEEN’S GARDEN TRAIL
– RIM TRAIL (PARTIAL)
Where To Stay Near Bryce Canyon National Park
Inside the park, the camping options are at the Sunset Campground and the North Campground. It’s not often that I say this, but the campsites inside the park are actually SO GOOD. While there aren’t any showers or wifi, there are bathrooms and a dish station, plus the sites are spread out very nicely among the pine trees. I stayed at the North Campground and I loved it because it was a short walk from the Visitor’s Center and bus station! The South Campground is further into the park, but closer to all the main trails, so this is a great choice if you want to hit the trails early. The parking in Bryce Canyon National Park is pretty limited, so the earlier you can get out, the better. If you can’t snag a reservation at these sites, consider Ruby’s Inn RV Park, or use resources like Campendium and iOverlander to find free camping nearby. This is one of those scenarios that you definitely want to stay inside the park if possible for convenience sake.
When visiting Bryce Canyon, the closest you can stay to the park is in the nearby town of Bryce. There aren’t too many options here since it’s so small, so you’re best options are going to be the Best Western PLUS Hotel, Ruby’s Inn, Bryce Canyon Pines, or in an Airbnb in town. The Airbnb’s in and near Bryce City are all comparable to the hotels, some actually are hotel room rentals, so it’s really up to your preference for your trip. Anything more unique is going to be worlds more expensive, but worth it if you have that in your travel budget.
Day Ten | Bryce Canyon National Park
Quite possibly one of my favorite hikes in Bryce Canyon, and in this part of Utah, is the Navajo Loop Trail. It sounds a BIT cliche since it’s so popular, but for the length and difficulty, this is a real winner. It is challenging, but with the route already mapped out and well-marked, I wouldn’t categorize this as difficult. You will be huffing and puffing up those switchbacks coming out of the canyon, though! Don’t say I didn’t warn you! The switchbacks are one of the most picturesque parts of the trail along with Wall Street. This trail get’s extremely busy from the morning through the end of the day, so get here as early as you can to avoid crowds. Even though Bryce Canyon isn’t as popular as Arches and Zion, the park is so condensed that it feels like there are so much more people than there are! Especially since most trails connect to one another.
From here, head over to the Swamp Canyon Overlook to hike the Sheep Creek and Swamp Canyon Loop. This is an off-the-beaten-path hike in Bryce Canyon that shows off the more woodsy side of Bryce Canyon. Basically, all the other hikes in the park are filled with orange and you’ll be surrounded by the pines on this one. For the best views, you’ll want to complete this counterclockwise! While it isn’t the most scenic, WOW hike, it is shaded, quiet, and peaceful, but still beautiful which is sometimes all you need after experiencing the bustle of hikers through (now) four different National Parks and a National Monument. When you get to the bottom, don’t be confused by the “Under The Rim”, it’s a connecting trail between Sheep and Swamp Canyon. Download the hiking map before you leave for better reference.
Next, enjoy lunch at the Natural Bridge, probably one of the most iconic viewpoints in the park! There is no hiking required to see this, so you can pull right up to it and have a stunning lunch view. The minerals that make up the arch make it a stark orange against the greens of the Ponderosa pine trees. Both of these with a bright blue sky gives you a rainbow view this time of day! It was one of my favorite things about Bryce Canyon National Park!
Wrap up here, then drive to the southernmost tip of the park, Rainbow Point, and Yovimpa Points. The NPS actually recommends beginning your self-driving tour of Bryce Canyon here since at both of these viewpoints you can see the entirety of the Bryce Amphitheater spread out before you! This is the highest point in the park sitting at 9100 feet above sea level! Walk down to the southern overlook, Yovimpa Point, and you’ll be able to spot a better view of Bryce’s unique geology. Here you can look out onto the Grand Staircase, the rock formation rather than the National Recreation Area, that is named for its dominant color in the canyon. The trail that connects both of these views is a little over one mile and rated as easy, so it’s a nice stroll for both of these views.
For the next-to-last hike in Bryce Canyon, you have the option of heading a little bit outside of the park to hike the Mossy Cave Trail. The drive from Rainbow Point is 40-minutes, so you can either opt to spend the afternoon relaxing at a different overlook or head to this trail. The hike is around a mile long and features a tiny waterfall and the Turret Arch. The finale of this trail can be a bit underwhelming for some, but the scenery is definitely worth walking this area for.
The HIGHLIGHT of your time in Bryce Canyon National Park is going to be spent on none OTHER than the Fairyland Loop Trail. For those that venture out on this 8-mile adventure, it ends up being their favorite trail in the park. Most visitor’s go for trails that are shorter and less demanding, so this trail tends to be a lot quieter than the other main spots. Ideally, you’ll head out on this trail before sunset, so you can make it to Tower Bridge by the time the sun goes down. Tower Bridge is a small spur off the main trail, so keep an eye on signage as you walk. You’ll be hiking out as it gets darker, so make sure you bring your headlamp. If you only had one day in Bryce Canyon, this would be the trail that you want to tackle because it is a mix of all the other trails in the park. Explore the top of the canyon, hike along the hoodoos, and see all of the unique rock structures that make up Bryce Canyon!
DAY TEN SUMMARY
– SHEEP CREEK AND SWAMP CANYON LOOP TRAIL
– RAINBOW POINT / YOVIMPA POINT
– MOSSY CAVE TRAIL (OPTIONAL)
– FAIRYLAND LOOP TRAIL / TOWER BRIDGE
Day Eleven | Drive To Zion National Park
– Drive from Bryce Canyon National Park and settle into your camp/hotel in Springdale.
– DRIVETIME | 2 HOURS
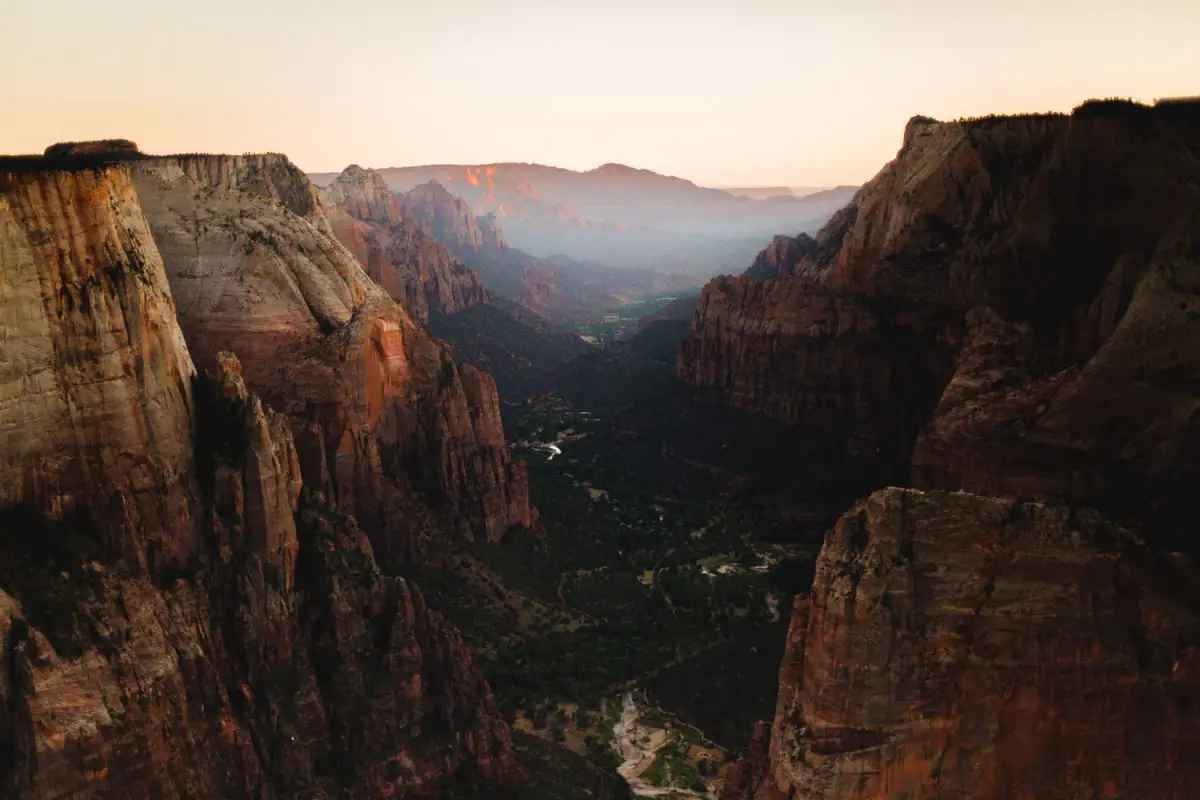
Rise and shine! Today is the day you’re tackling what many consider the BEST park on a Utah National Parks road trip, Zion National Park! If you want to avoid the MASSIVE line to get in during the late morning, you want to wake up extra early and get to Zion on or before 8:00 am to zip through and get a parking spot. Otherwise, take advantage of this more chill day, sleep in, and head into the park slowly this morning.
- UTAH NATIONAL PARKS ROAD TRIP ITINERARY TIP: During the high season, March through November, Zion National Park requires you to ride the shuttle to get around the park. You won’t be able to get around in your car, so make sure you board the shuttle early to get one of the first stops at the main trails. This is a great tip to avoid crowds here!
Once you get settled into where you’re staying, you’ll want to board the shuttle and head to the Emerald Pools Trail. This trail, among the others today, is a great introduction to the park. This is an easy, 1.4-mile trail that is very, very busy in high season. The highlight of the trail is a series of pools and a waterfall going over the side of the canyon. The hike is evenly shaded and sunny, and the pools are a great way to cool down in the heat!
At the trailhead, hop back onto the shuttle and get off at the Zion National Park Visitor’s Center. From here, you can rent a bike at Zion Outfitter to ride the 3.4-mile Pa’rus Trail. This is a paved trail that follows the Virgin River, crosses a handful of bridges, and is relatively flat, so it’s great for a nice afternoon cool down. It gets so hot in the canyon that feeling the wind while you ride the bike is the best feeling. The rental prices also go down after midday, so you’ll save money as well! This isn’t strictly a bike path, either, so if you want to walk it, that’s an option too!
Along the Pa’rus Trail, after passing the South Campground, you can take a small detour on the left to go see the Zion Human History Museum. There are tons of permanent displays inside the museum which feature American Indian culture, historic pioneer settlement, and Zion’s growth as a National Park. You can learn about Zion’s original indigenous settlers and what life was like after the park was settled by Euro-Americans in 1919. There are ancient artifacts and collections in this museum that prove that Zion has been settled since before 7000 BCE!
- UTAH NATIONAL PARKS ROAD TRIP ITINERARY TIP: If you’re interested in seeing more remnants of ancient settlers of Zion Canyon, look into hiking the Petroglyph Canyon Trail. It’s a short trail that will take you to over 150 etchings along the walls of the canyon! Inquire at the Zion National Park Visitor’s Center! Another great trail is the Archaeology Trail behind the Visitor’s Center! You’ll be able to see ancient Anasazi food shelters!
Head back to Zion Outfitter to return your bike. If you’re planning on hiking the Narrows, then you can go ahead and plan to pick up your rental gear here for the following morning if you didn’t reserve your rental online. After this, go ahead and head back to the Visitor’s Center to hike the Watchman Trail. This trail is one of the most famous in the park for sunset photography of the Watchman Tower. The trail is 3.1-miles and starts out with some moderate switchbacks up to the outlook plateau. You’ll be walking along Zion’s unique flora and fauna through small pockets of shade, enjoying the canyon’s geology.
For sunset, the Canyon Overlook Trail is perfect to wrap up one of the last days on this Utah road trip. This trail is one of the easy hikes in Zion, so you’re doing very little work for one of the best views in the park. It’s comparable to Observation Point! Not AS good, but very close! The only setback with this trail is that there is basically no parking at the trailhead, so you may have to park at one of the overflow spots down the road and walk over. You probably spotted this trail on your way into the park this morning! It’s only a mile in length, so pack up some sandwiches for dinner if you’d like, watch the sun fall behind the canyon, and head back to camp.
DAY ELEVEN SUMMARY
– BIKE THE PA’RUS TRAIL
Where to Stay in and near Zion National Park
There are three main places you can stay in Zion National Park that are actually IN the park: Zion Lodge, the Watchman Campground, and the South Campground. No matter which one of these you choose, you need to book FAR in advance. Ideally, start looking at all of these more than six months away from your trip. These are the most popular places to stay in Zion National Park because they’re closest to the park.
The Zion Lodge gives you all the amenities you’d ever want and more. This is ideal if you want to be close to the park but don’t want to rough out your night in a tent. One aspect I enjoy about this lodge is that they painted the lodge the same color scheme as the canyon, so it doesn’t look like there’s a massive retreat in the middle of nature. I appreciate that the National Park Service has done a great job at preserving this park from industrialism in its buildings, as well as pollution from cars and light pollution! Curl up by the fireplace, look up at Zion’s canyon walls, and enjoy a quiet desert retreat!
The Watchman Campground requires advance reservations. The sites roll out on a six-month basis for stays in March through Thanksgiving weekend in November. After that, sites are available on a first-come-first-served basis through February. Not only is this campground right under the Watchman rock formation, but it also gives you walking access to the Pa’rus Trail, Zion Visitor’s Center, and the Virgin River if you want to take a dip during those scorching summer days! If you’re planning on doing lots of sunrise missions, then this is a great option to grab those first shuttles into the park. The grounds have spacious campgrounds, toilets, NO showers, and electric hookups. The South Campground is basically the same as the Watchman, but with fewer amenities. The campground is open from early March to the end of October and reservations open 14 days before your trip. So if you need a campsite for March 14th through the 15th, you can book it beginning March 1st. This is great if your trip is being planned more last minute and you didn’t consider camping options far in advance. You’ll also have access to the Pa’rus Trail, Virgin River, and the Zion National Park Visitor’s Center from your campsite.
Outside of Zion, in Springdale, the Canyon Vista Lodge is an amazing option for a place to stay. Although it’s not IN Zion, it’s surrounded by Zion National Park on three sides of the property! Find comfort in the cleanest rooms, sipping on wine outside listening to the still whirr of the Virgin River. One of the biggest perks of staying here is your booking comes with a free breakfast from Oscar’s Cafe or Porter’s Smokehouse and Grill.
Accommodation options in and near Zion are endless from luxury stays to more budget-friendly options like the Pioneer Lodge and the Bumbleberry Inn. For other camping options, browse Campendium, HipCamp, or The Dyrt.
Day Twelve | Zion National Park
For this day of your Utah National Parks road trip itinerary, it’s crucial that you board the first shuttle out to the Angel’s Landing Trailhead. While avoiding crowds is mainly for peace of mind, today it’s partially for safety purposes, too. Angel’s Landing, after Scout’s Lookout, has a chain section where you’re climbing up a ridge using chains to help you guide your way up. Once it gets really busy, the traffic can make this section more dangerous since there are people going up and down constantly. To get on that first shuttle, arrive at the bus station 30-minutes to an hour before the shuttle is scheduled to arrive. The trail is 4.5-miles long and is rated as difficult/strenuous. It’s definitely a journey to get up here, so take your time and bring plenty of water. The trail has two main sets of switchbacks that take you up the canyon, with the second being the infamous Walter’s Wiggles. After these, you’ll arrive at Scout’s Lookout which is the section of the trail just before the chains. You can still get nice views from here and this is where you can turn around if you’re not comfortable doing the rest of the trail.
After sweating your way up the landing, floating down the Virgin River is going to be just what you need to cool down in the hot desert sun. This 2-mile float will take you through the pathway of the river that carved Zion Canyon twenty million years ago! Zion Canyon and the Colorado Plateau were both originally basins that filled with sedimentary rock from eroding mountains nearby, so you’ll be able to see the distinct layers of the canyon that formed millions of years ago. The excursion is a nice mix of relaxing and navigating rocks and small rapids, so don’t expect something like a lazy river. I recommend going back to camp, relaxing, and refueling, then head here mid-afternoon to start. You can pick up your tube rental from Zion Outfitter, and they are available on a first-come-first-served basis. You’ll start the float at Zion Outfitter and end it in Springdale Park. From there, you can board a free shuttle back to your car! This exciting thing to do in Zion will take you underneath Cottonwood Trees and through towering sandstone cliffs. This is a great way to see Zion’s wildlife: mule deer, rock squirrels, foxes, and rabbits that nest along the riverbank.
If your legs are up for it, you have a few options for the next venture. You can bike the Zion Scenic Drive, the road that is closed for cars during the high season and goes all the way into Zion Canyon, ending at the Temple of Sinawava. Or you can choose to drive one of Zion’s Scenic Routes. Zion-Mt. Carmel Highway or the Kolob Fingers Scenic Byway. You can only take your car onto the Zion Scenic Drive in the wintertime, so out of all of these, biking the Scenic route is going to be the most bang for your buck. If you’re not interested in biking, you can use the shuttle service! For bike rentals, you’ll go to the main hub we’ve been using for rentals, Zion Outfitter. This is one of the many incredible things to do in Zion and you don’t want to miss it!
Close out the day on the Weeping Rock Trail. Short and sweet, this trail takes you to the back of Zion Canyon and under a crescent-shaped tunnel that looks like it’s “weeping“. You’ll be able to spot Zion’s iconic Great White Throne through water that has filtered through the Navajo sandstone overhead for almost 1200 years. For this only being 0.3 miles, the views are eye-catching and offer a unique angle of Zion from below. This is also a nice spot for sunset if want to do a hike, but don’t want to hike back in the dark! Many of the other trails in Zion National Park become dangerous at night from exposure and animals, so this is a nice alternative.
- UTAH NATIONAL PARKS ROAD TRIP ITINERARY TIP: The Weeping Rock Trail is currently closed due to a large rockfall. Check Zion’s current conditions to look at trails that are open or closed.
Keep in mind that this day you’ll need to pick up your gear rentals at Zion Outfitter if you’re hiking the Narrows tomorrow!
DAY TWELVE SUMMARY
– TUBE DOWN THE VIRGIN RIVER (OPTIONAL)
– BIKE THE ZION SCENIC DRIVE / DRIVE A SCENIC ROUTE
Day Thirteen | Zion National Park
This will likely be your favorite day on your Utah National Parks road trip itinerary because you get to tackle two of the most well-known hikes in Zion National Park, and arguably the most beautiful, The Narrows and Observation Point. On my own Utah road trip, this was the most fun I’d had on the whole trip!
With your gear rental from Zion Guru, you’ll want to board the first shuttle at the Visitor’s Center to the Temple of Sinawava. The Zion Narrows gets crazy busy and begins to fill up after the first shuttle drops you off. As long as you’re the first group to get dropped off, you’ll have the entire trail to yourself and then you’ll be greeted by civilization again once you make it back to Wall Street. The trail begins on the Riverside Walk. It’s about a mile of concrete that takes you to the Zion Canyon opening and from there you’re on your way. You’re going to be in the water for the majority of the trail and you can hike in as far as you’d like since the trail is out-and-back. I hiked all the way through Wall Street, just before Big Springs. Since you’re doing the bottom to top route, you’re only allowed to hike in as far as the Big Springs backcountry campsite and then you have to turn around. How far you go depends on your energy levels this day. I recommend at least hiking to Wall Street, the narrowest and most picturesque part of Zion Canyon. Use this guide for hiking the Narrows to help you along your way!
After this, a lot of relaxation is recommended. Although in the Narrows you’re walking through the water the entire time, the rocks are uneven and you’re battling currents, so your feet will likely be sorer than you think! This is a great day to go into Springdale for some showers and munch on some flavorful Mexican food at Whiptail Grill!
In the afternoon, before sunset, you’re going to head over to the East Mesa Trailhead to hike to Observation Point. This isn’t the traditional route, so instead of it being a difficult hike, it’s a very leisurely walk out to the viewpoint. It takes a little longer to get to the trailhead since you have to drive out of the park to get here, but it’s SO worth it, especially for how easy it is. The road to the trailhead isn’t paved, but it’s nothing impassable with a regular car. The parking lot can also get a bit bumpy, but there are plenty of spots you can park in that you won’t get stuck. If you don’t feel comfortable driving on the rocky road, then you can park before it and walk to the trailhead. The full hike is around 6.7 miles total with only 695 feet of elevation gain through stunning vistas guiding you to the overlook. The first two miles are a little bland, I must say, but after that, you start to get sneak peeks into the canyon until it eventually opens up to the MAGNIFICENT Observation Point. From here you’ll get a tunnel view down Zion Canyon and you’ll even be able to spot fellow hikers attempting Angel’s Landing from below! The sunsets here are off the chain and one that you don’t want to miss!
This is the perfect trail to end your last day of exploring on your Utah National Parks road trip itinerary! Once back at basecamp, set up your things to drive home tomorrow!
DAY THIRTEEN SUMMARY
– OBSERVATION POINT VIA EAST MESA
Day Fourteen | Drive Home
– Today you’ll be leaving Utah and driving back home.
Where you drive and fly back to will largely depend on the city that you flew in or drove from. If you drove all the way to Utah like me, make sure you have all your favorite music and podcasts downloaded before you head out on your journey home and stock up on snacks in Springdale! If you’re looking for more stops on your way home, consider adding Grand Canyon National Park and Monument Valley for quick stops before heading home.
You can find my Spotify playlists here for some new music!
Since this road trip is from point a to point b, where you go from here depends on if you bought one-way flights or roundtrip flights. If you’re traveling on a budget, make sure you use these tips for finding cheap flights! Car rentals can be found and compared with ease using Kayak!
Utah National Parks Road Trip Map
Utah National Parks Road Trip Itinerary Overview
DAY ONE | DRIVE TO ARCHES / ARCHES NATIONAL PARK
DAY TWO | ARCHES NATIONAL PARK
DAY THREE | ARCHES NATIONAL PARK
DAY FOUR | DRIVE TO CANYONLANDS
DAY FIVE | CANYONLANDS NATIONAL PARK
DAY SIX | DRIVE TO CAPITOL REEF NATIONAL PARK
DAY SEVEN | CAPITOL REEF NATIONAL PARK
DAY EIGHT | DRIVE TO THE GRAND STAIRCASE-ESCALANTE
DAY NINE | DRIVE TO BRYCE CANYON NATIONAL PARK
DAY TEN | BRYCE CANYON NATIONAL PARK
DAY ELEVEN | DRIVE TO ZION NATIONAL PARK
DAY TWELVE | ZION NATIONAL PARK
DAY THIRTEEN | ZION NATIONAL PARK
DAY FOURTEEN | DRIVE HOME
HELPFUL GUIDES FOR YOUR UTAH MIGHT 5 ROAD TRIP:
– Packing For A Day Hike: 12 Adventure Essentials To Get You Exploring
WANT EVEN MORE GUIDES TO UTAH’S NATIONAL PARKS? CHECK THESE OUT:
ZION NATIONAL PARK
– How To Conquer The Narrows Hike In Zion National Park (Complete Guide)
– 2 Days In Zion: The Ultimate Zion National Park 2 Day Itinerary
CAPITOL REEF NATIONAL PARK
– How To Spend One EPIC Day In Capitol Reef National Park
– Hiking The Cassidy Arch Trail In Capitol Reef National Park
BRYCE CANYON NATIONAL PARK
– The Ultimate Guide To Camping In Bryce Canyon National Park
– 10 Jaw-Dropping Bryce Canyon National Park Hikes You CANNOT Miss
– One Day In Bryce Canyon: The Perfect 1-Day Itinerary
CANYONLANDS NATIONAL PARK
– The 10 BEST Hikes In Canyonlands National Park
ARCHES NATIONAL PARK
– The Ultimate Guide To Camping In Arches National Park
– 10 Arches National Park Hikes That Will BLOW Your Mind
– The BEST Guide To The Delicate Arch Hike In Arches National Park
– A PERFECT 3-Day Itinerary For Arches National Park
– Tower Arch Trail: The Best Hike In Arches National Park
Do you plan on following this itinerary but are shortening or extending the days? Have any questions? Leave them below and I’ll help you out!
Aaren
Did you find this Utah National Parks road trip itinerary helpful?


I just discovered you through tailwind and OMG this is so helpful! We’re currently planning a road trip in the US and I’ll definitely come back to this! Thank you so much for taking the time for writing such a detailed guide! Saved!! 🙂
Hi Julia!
So glad you loved this guide! It took ages to write but it looks like it paid off (: Have fun on your road trip!