
Last Updated on September 14, 2025
If you’re planning a trip to Arches National Park and you google this infamous park in Utah, the Delicate Arch Hike is going to be the number one thing that is recommended to do in Arches whether you have one day, two days, or three days. You know, while most of the time I am generally hesitant about hopping on some bandwagons, this hiking wagon is DEFINITELY one that you want to board.
The Delicate Arch trail is just flat out incredible. It’s tough. It’s rewarding. It’s absolutely worth all the hype that has been put around this landmark. Out of all the best hikes in Arches National Park, this was the one that blew my mind the most, right after the Tower Arch Trail.
This guide to the Delicate Arch hike is going to include where it’s located inside the park, how to get to the trailhead, a trail overview, trail description, tips, AND essentials you need to successfully complete this hike. If there is a TOP guide on this hike on the internet, it’s right here!
This post does contain affiliate links for the products I mentioned, but as always, all opinions are my own. I make a small commission, at no extra cost to you, when you make a purchase or booking through these links. This helps to support this space and keep me blogging, which I am so extremely thankful for.
Where Is The Delicate Arch Trail Inside Arches National Park?
The Delicate Arch Hike is about halfway up the Arches Scenic Road that drives through the entirety of Arches National Park. As famous as this arch is, there is no secret to getting here. You just need to follow the signs on the road! You won’t be able to GPS through the park since you’ll lose service almost immediately once you enter, but you can save this map on your Google Drive for later when you head out!
How To Get To The Delicate Arch Trailhead
Getting to the trailhead of the Delicate Arch is very simple since it’s extremely popular and the roads in the National Park are well marked.
The trailhead is about 25 minutes from the Arches National Park visitors center and about 35 minutes away from Moab so keep that in mind if you’re planning a sunrise hike! A huge plus about going for sunrise is that you won’t have to wait for lines and traffic to get into the park, so these transit times are very accurate for early morning hours. Once you enter the park, all you need to do is follow the two-lane road for about 20-minutes and then keep your eyes peeled for a road on the right, aptly named Delicate Arch Road, and it’ll take you directly to the parking lot. There will also be a massive sign there to point you in the right direction. You can’t miss it!
Delicate Arch Hike Details
-
Best Hiked | Sunrise
-
Best Light | About an hour after sunrise, and sunset.
-
Trail Length | 3.1 miles RT
-
Trail Difficulty | moderate
-
Hiking Time | ~2-3 Hours RT
-
Permits | None
On The Delicate Arch Trail
The start of this hike begins on a wide almost gravel road type of foundation and almost immediately you’re going to begin your ascent up to the arch. It isn’t a steady incline the entire way, so you’ll have periods of flat and incline throughout the entire 1.5 miles to the arch. As you get further and further into the trail, it becomes more primitive, so watch out for cairns, small stacks of flat stones, and arrows to guide you in the right direction. If you’re hiking in the dark, it might be a little more difficult to navigate, so use your phone light or pack a headlamp (this one is pretty awesome!)
Once you hop onto the gravel, you’re going to climb a couple of hills until you’re greeted with the infamous slickrock. It’s a large portion of weathered sandstone that is very smooth to the touch which makes getting your grip a bit tough. Take this part slow and make sure you get your footing with each step. I trudged up this thing, but you’ll definitely want to stop for a water break at least once with this elevation gain. After the slickrock, the Delicate Arch trail gets pretty level and you’ll be navigating over rocks and through some sandy portions. This is the part where you might get turned around so keep those eyes peeled for the cairns.
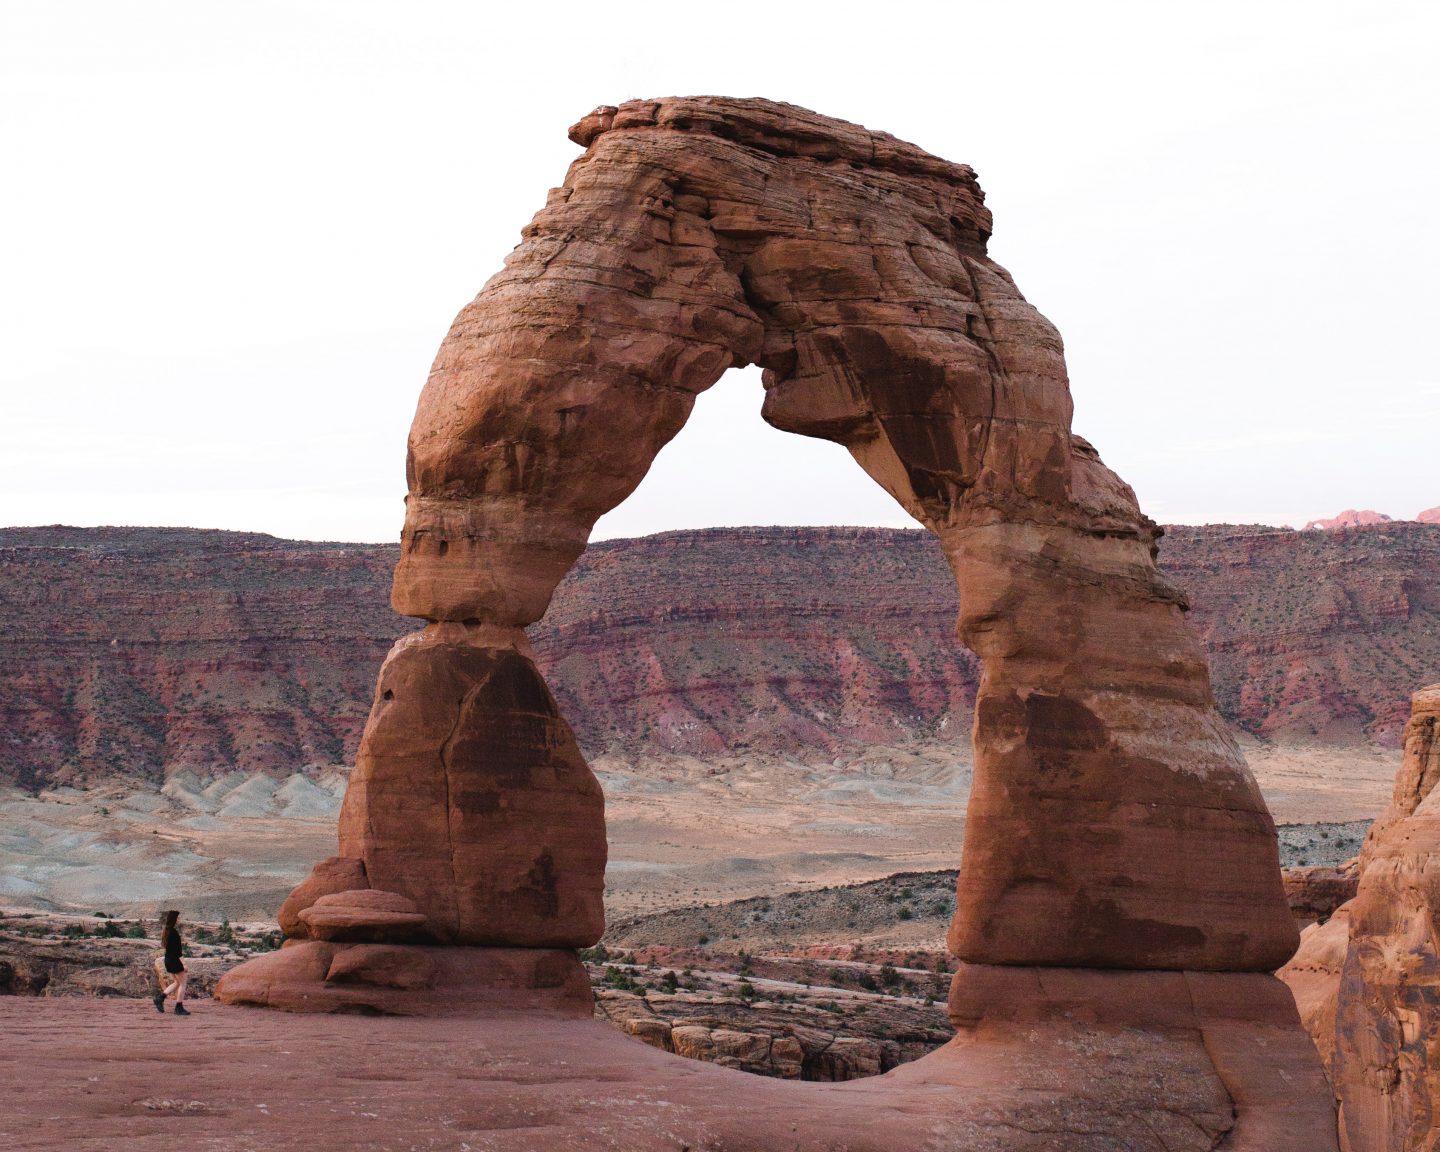
After the navigation portion comes to the pathway climb all the way up to the arch. It’s here that you’ll feel that, “ooh, we’re close!” feeling and you’ll get to see the rewarding view of all the elevation you just gained. If you’re afraid of heights, make sure you stay to the right side of the pathway going up since there is a direct drop off on the left side. The pathway is wide enough for two people and completely safe! After passing the Twisted Donut, you’ll climb up a bit of rock and BOOM, you’ve arrived at, what I like to call, the toilet bowl!
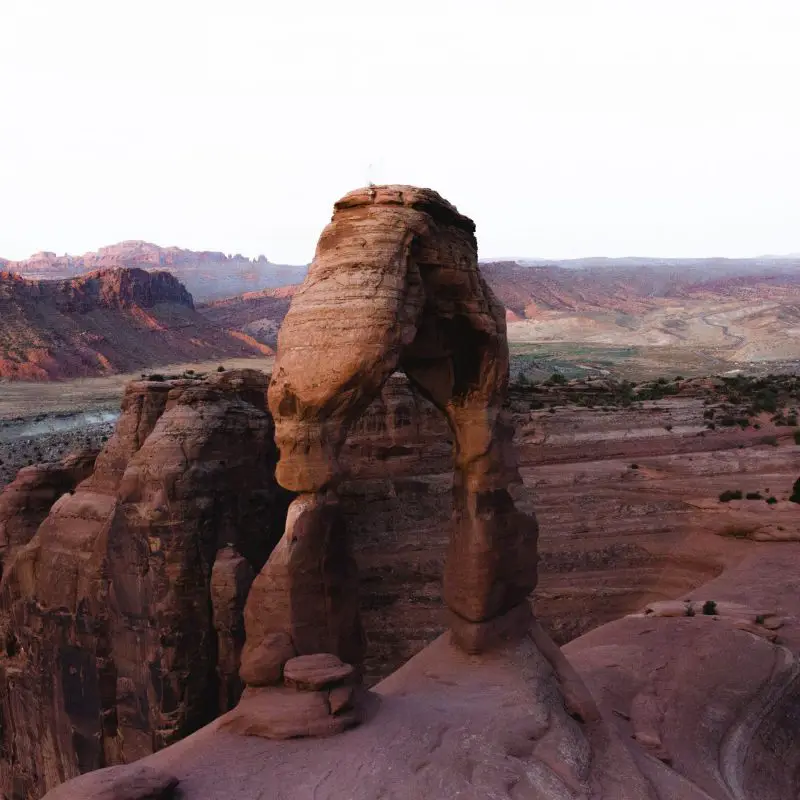
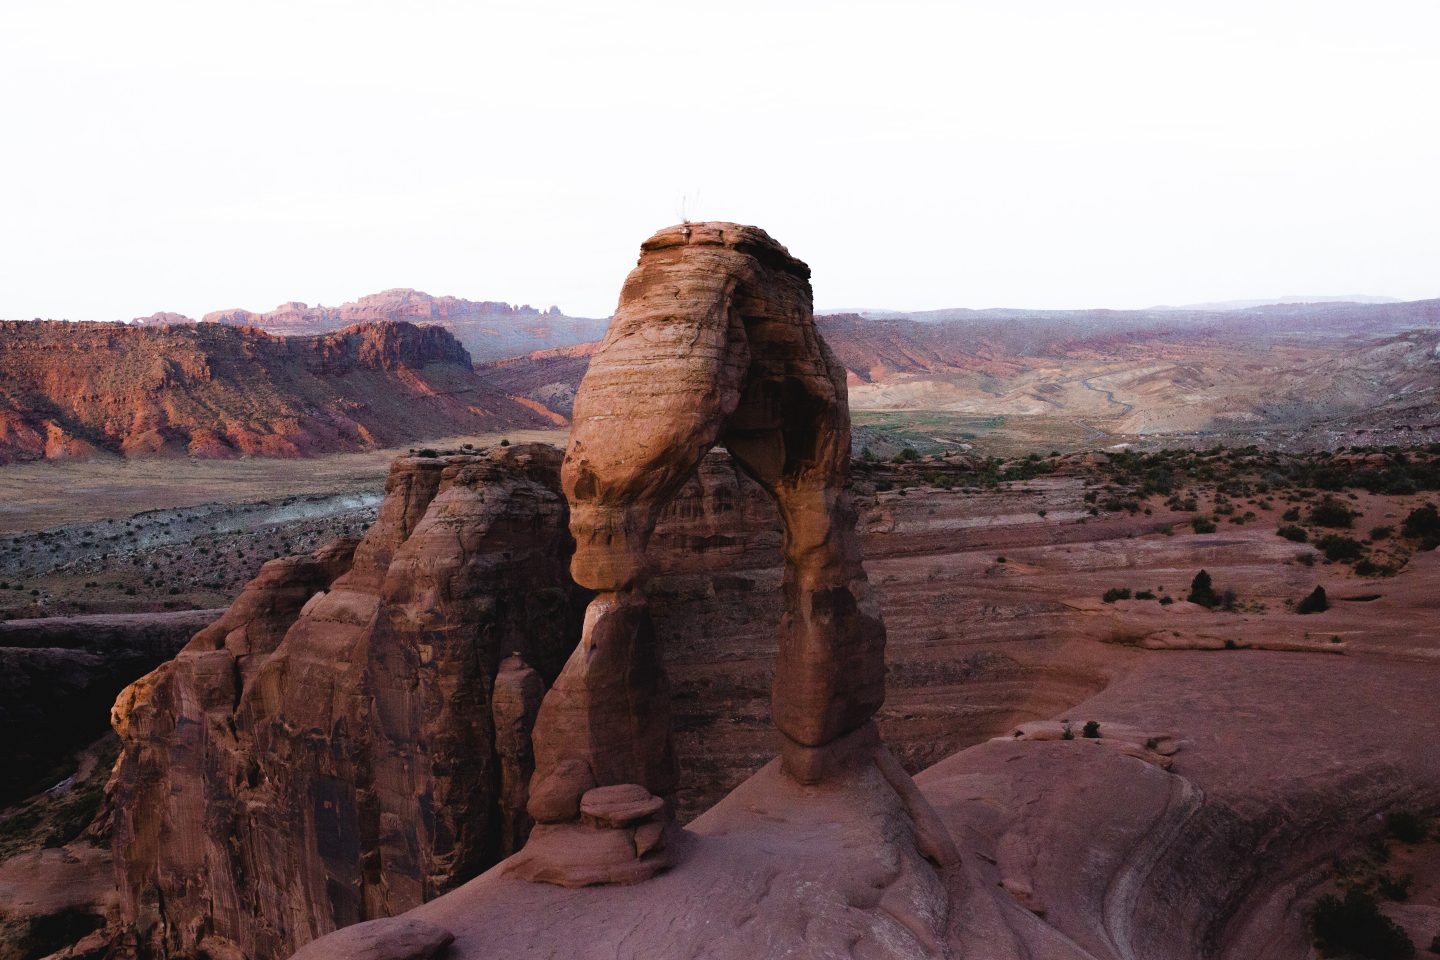
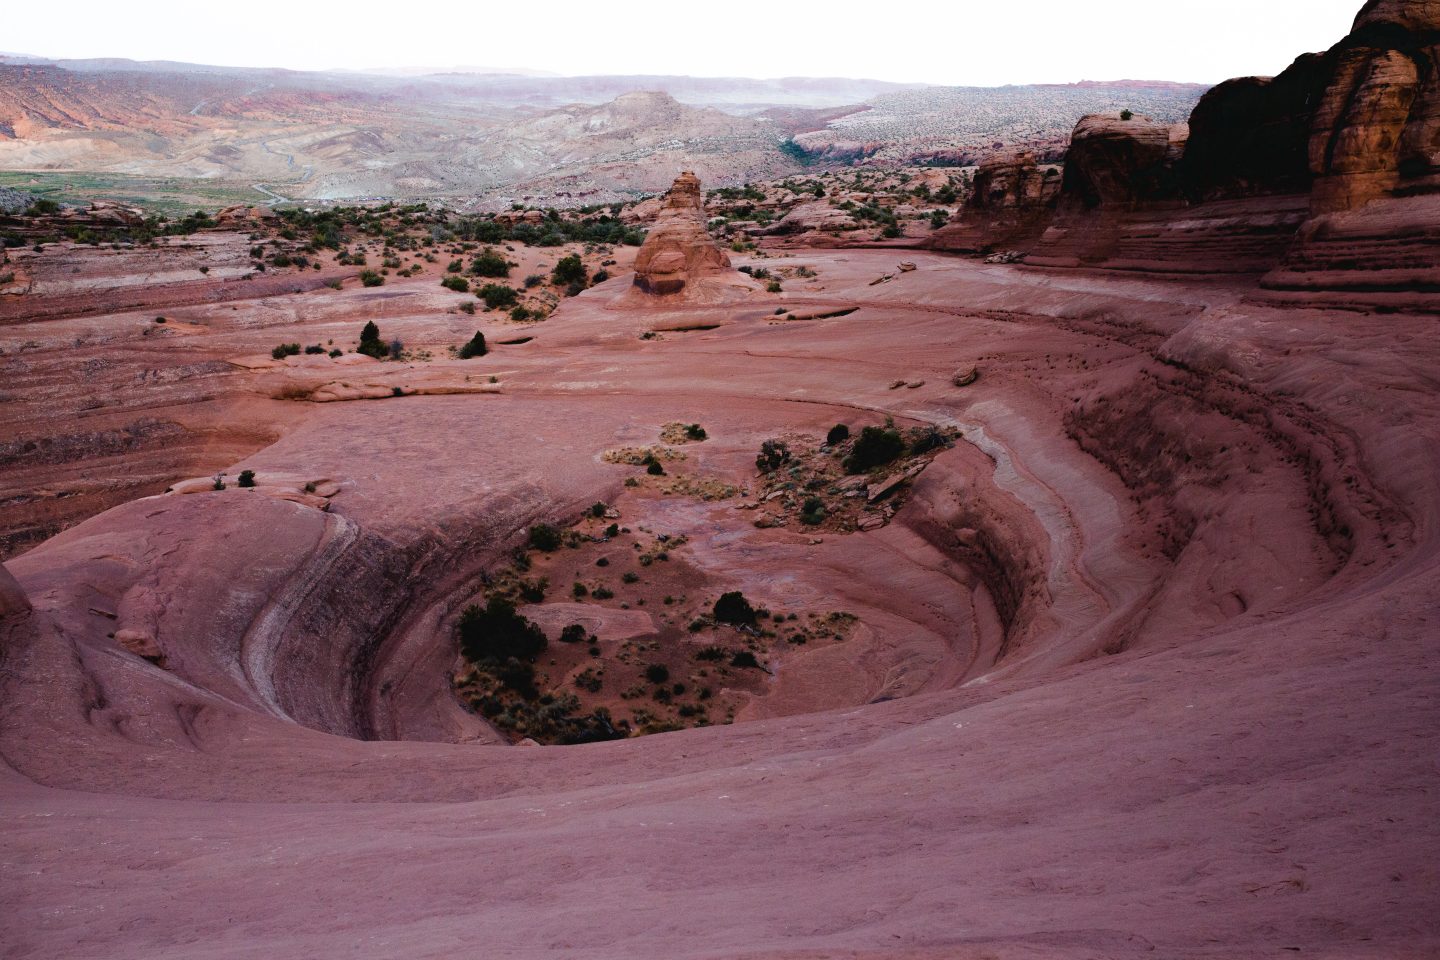
The landscape around the arch is an enormous circular area, which resembles a toilet bowl hence the name, and you’ll see the Delicate Arch from afar. Be careful with how close you approach the toilet bowl because three people fell into this in December of 2019 and one of them passed away due to the fall, so it’s very important that you proceed with a bit of caution.
What I liked most about the top of this hike was that the area is so expansive that you can easily explore around the arch and find a little spot to yourself. I recommend climbing the rocks to the left of the arch to view a panoramic view over Arches National Park! It’s stunning!
Essentials For The Delicate Arch Hike
-
Headlamp (if hiking for sunrise/sunset)
A headlamp is one of the most underrated pieces of camping and hiking equipment, in my opinion. It’s also a lot better than using your phone light since you can strap that bad boy to your head, select your brightness, and then go about your business. Whereas with a phone light, you have to hold it up, find a spot to set it down, possibly have your hands full, and things just get way too messy and frustrating. Whenever I bought my favorite headlamp, I was honestly dumbfounded at the fact that I had put off getting one for so long! Get yo’self one!
-
Day Backpack
I really don’t like to be carrying a lot of things if I am taking day hikes, so having a day pack where I can toss all these essentials into is, well, essential! If I want something more casual, I always grab for my Fjallraven Kanken backpack since it’s stylish and it is able to hold my camera in it, but if I need all of my photography gear, then you’ll always see me carrying along with my WANDRD pack that is perfect for travel photographers. However, if we’re talking in terms of practicality, I will always recommend day packs from Osprey. It’s my tried and true backpack brand and they will last decades!
-
Reusable Water Bottle + 2L of Water
As soon as you enter Arches National Park, you’re going to spot reminders everywhere to carry lots of water when you hit the trails. If you’ve been following my journey for a little bit, you’ll know that Hydro flasks are my right haaaaaand, they’re my go-to (the Drake reference probably doesn’t carry into text, but if you got it, you got it). My daily bottle is around 1 liter, but that isn’t near enough water for longer hikes, so I recommend carrying at least two with you at all times. It will make your bag heavier, but as you go through the hike and drink water, your bag will slowly get lighter so it’s a win-win. The downside of Hydro flasks is that the weight of them can be a lot in your pack, so a cheaper, lighter option would be these narrow-mouth Nalgenes that are just as good and great if you’re on a budget.
-
Hiking/Sun Hat
The desert is a hot hot HOT place with lots of sunshine, so you want to protect your face from the direct sunlight. There isn’t a lot of shade in Arches and the sun will be higher in the sky even on your way back if you choose to hike this super early in the morning, so a proper hat going to keep the sun out of your eyes, especially with this hat that has UV protection and a quick-wicking sweatband. I just got it specifically for my trip to Utah, and I already know I am going to have it for a while. They come in a cool selection of colors, but the grill color is my favorite.
-
Hiking Shorts
So hiking in the desert in the sun is a recipe for the one thing that everyone hates; chafing. Am I right, ladies? Wearing shorts where the seam doesn’t rub against my inner thigh is the MOST essential thing when I take desert hikes and my tried and true shorts for this are the Patagonia Baggies. I have them in two different colors, the black and blue, but I plan on ordering these awesome ones with melons on them and these pretty orange ones. I recommend sizing up in them because the fit of the shorts runs on the smaller side, but they do have a drawstring so you can tighten them however much you need. Also, they have pockets! See them here!
-
Hiking Top
With all the sweating that is going to go down on the Delicate Arch hike, you’ll want a top that is going to keep you cool, wick away sweat, and keep you stench-free. I’m currently giving the Patagonia Capilene Cool Daily T-Shirts a shot and so far I am a huge fan of them! They lay very nicely and don’t stick to your body even on the hottest of days! I recommend getting a light color so you can stay cool.
-
Sunscreen
Sunscreen should be the first thing you pack into your bag for trails, trips, and even everyday life. Protecting your skin is so so important and I trust Raw Elements SPF 30 Sunscreen to protect my skin on the trails. Ever since my mom was diagnosed with melanoma years ago, I always make it the first priority to apply sunscreen before I begin hiking. The Raw Elements Plastic-Free Tins keep my skin protected and have prevented sunburns even in the heat of the desert! I love it because it’s biodegradable, reef-safe, broad-spectrum, AND you can buy a tinted tin version for your face so you don’t look like Caspar like when you apply other sunscreens. Raw Elements is my favorite, but you can browse these other awesome zero waste sunscreens to try!
Tips For The Delicate Arch Hike In Arches National Park
-
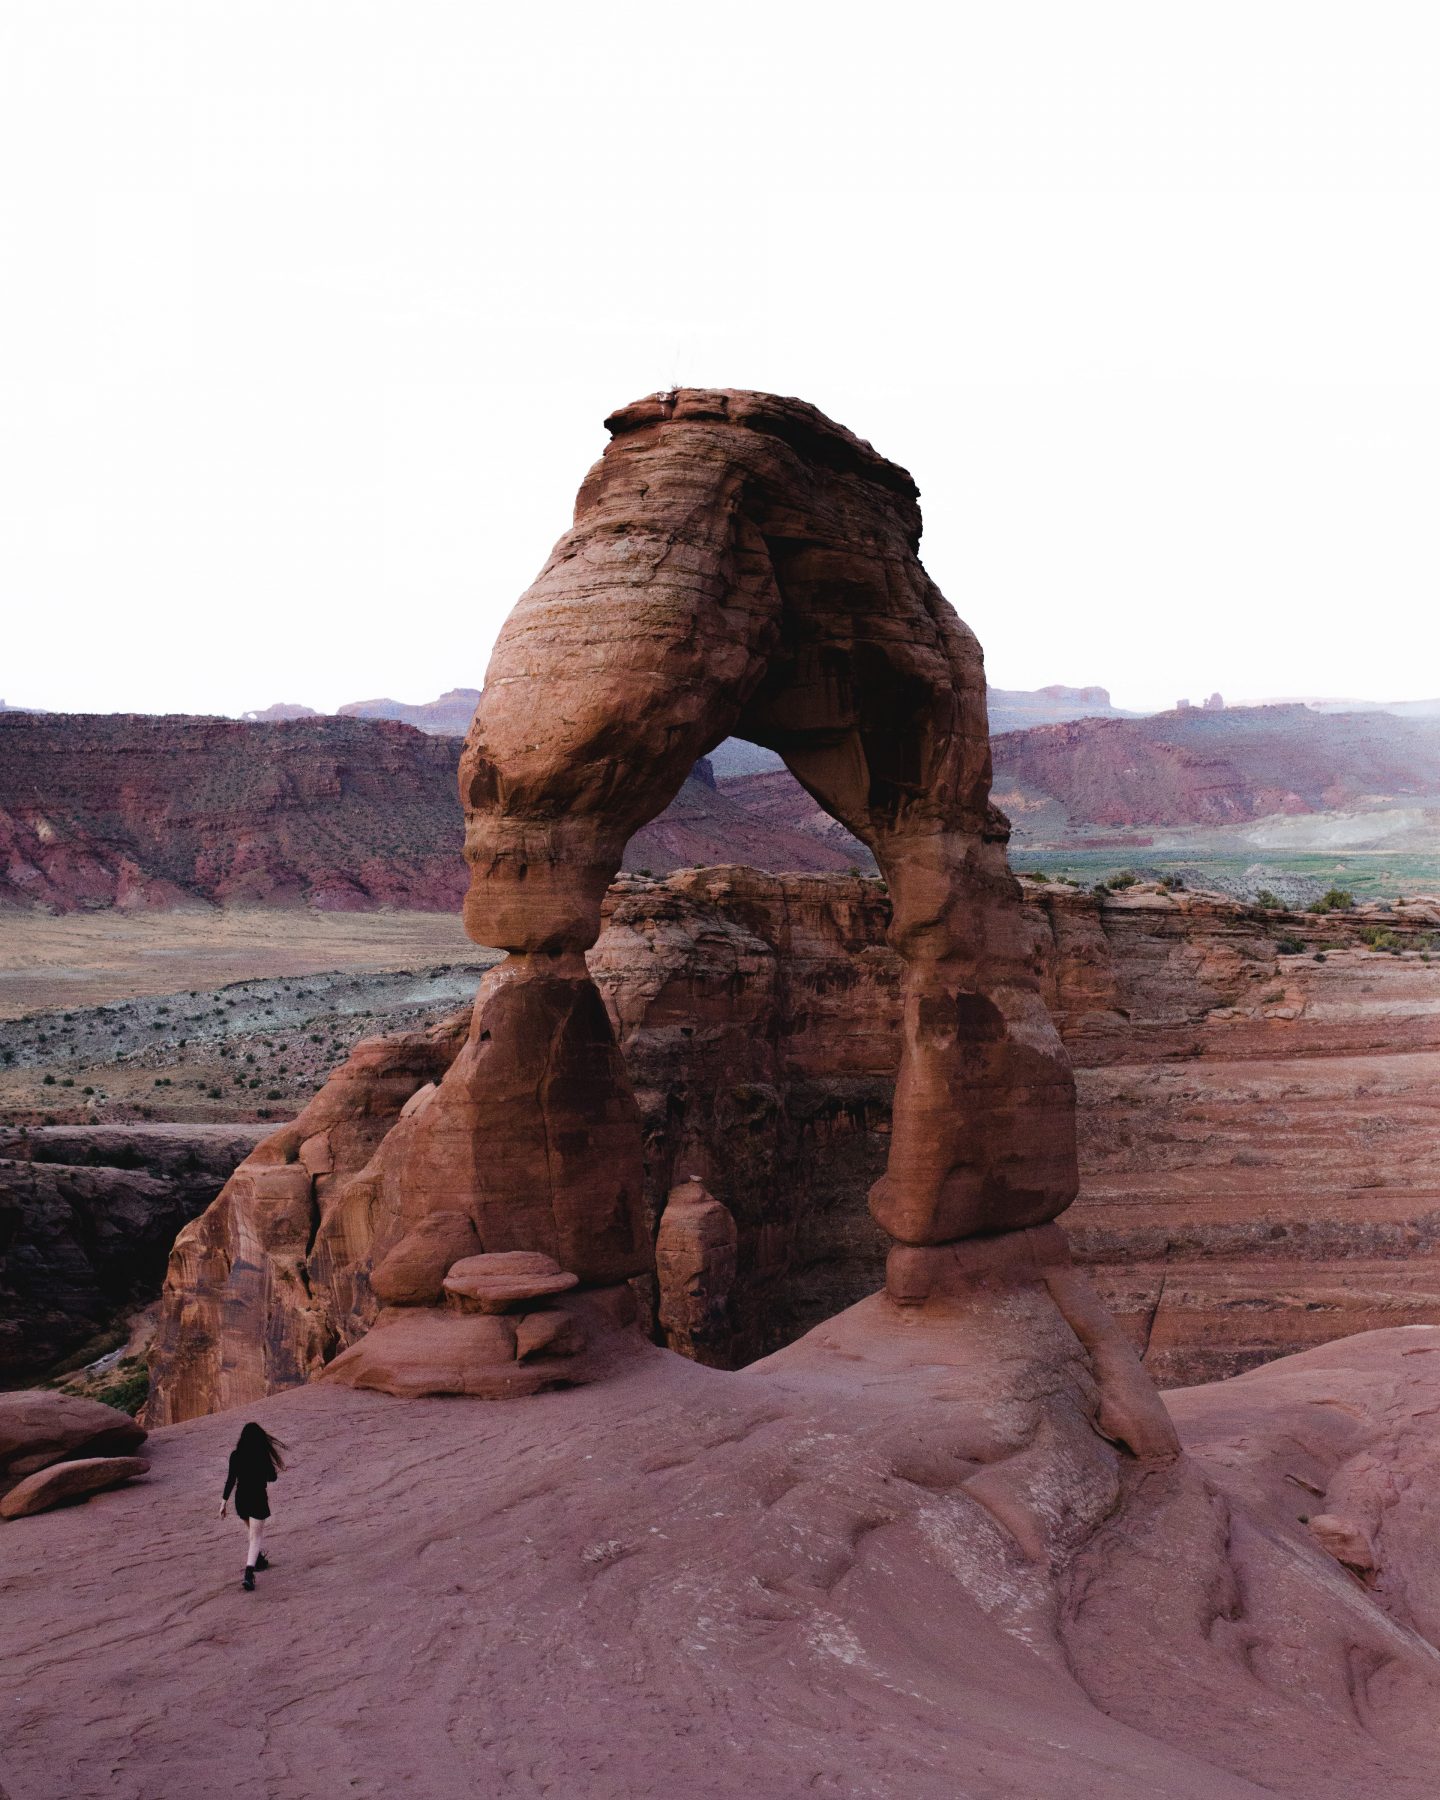
If visiting in high season, there is never a time where you’ll be solo at the Delicate Arch.
Even if you wake up at the BUTTCRACK of dawn, skip your coffee and/or breakfast, to see the first light of the morning hit this bad boy, you’re STILL going to be joining around 20-30 other people. Granted, it’s not near the crowds as a midday visit, but it’s something to take into account. You’ll still be able to get a solo picture with the Delicate Arch, but you may have to wait in line. If you’re taking on the Delicate Arch hike in the winter months, you may just get extremely lucky (;
-
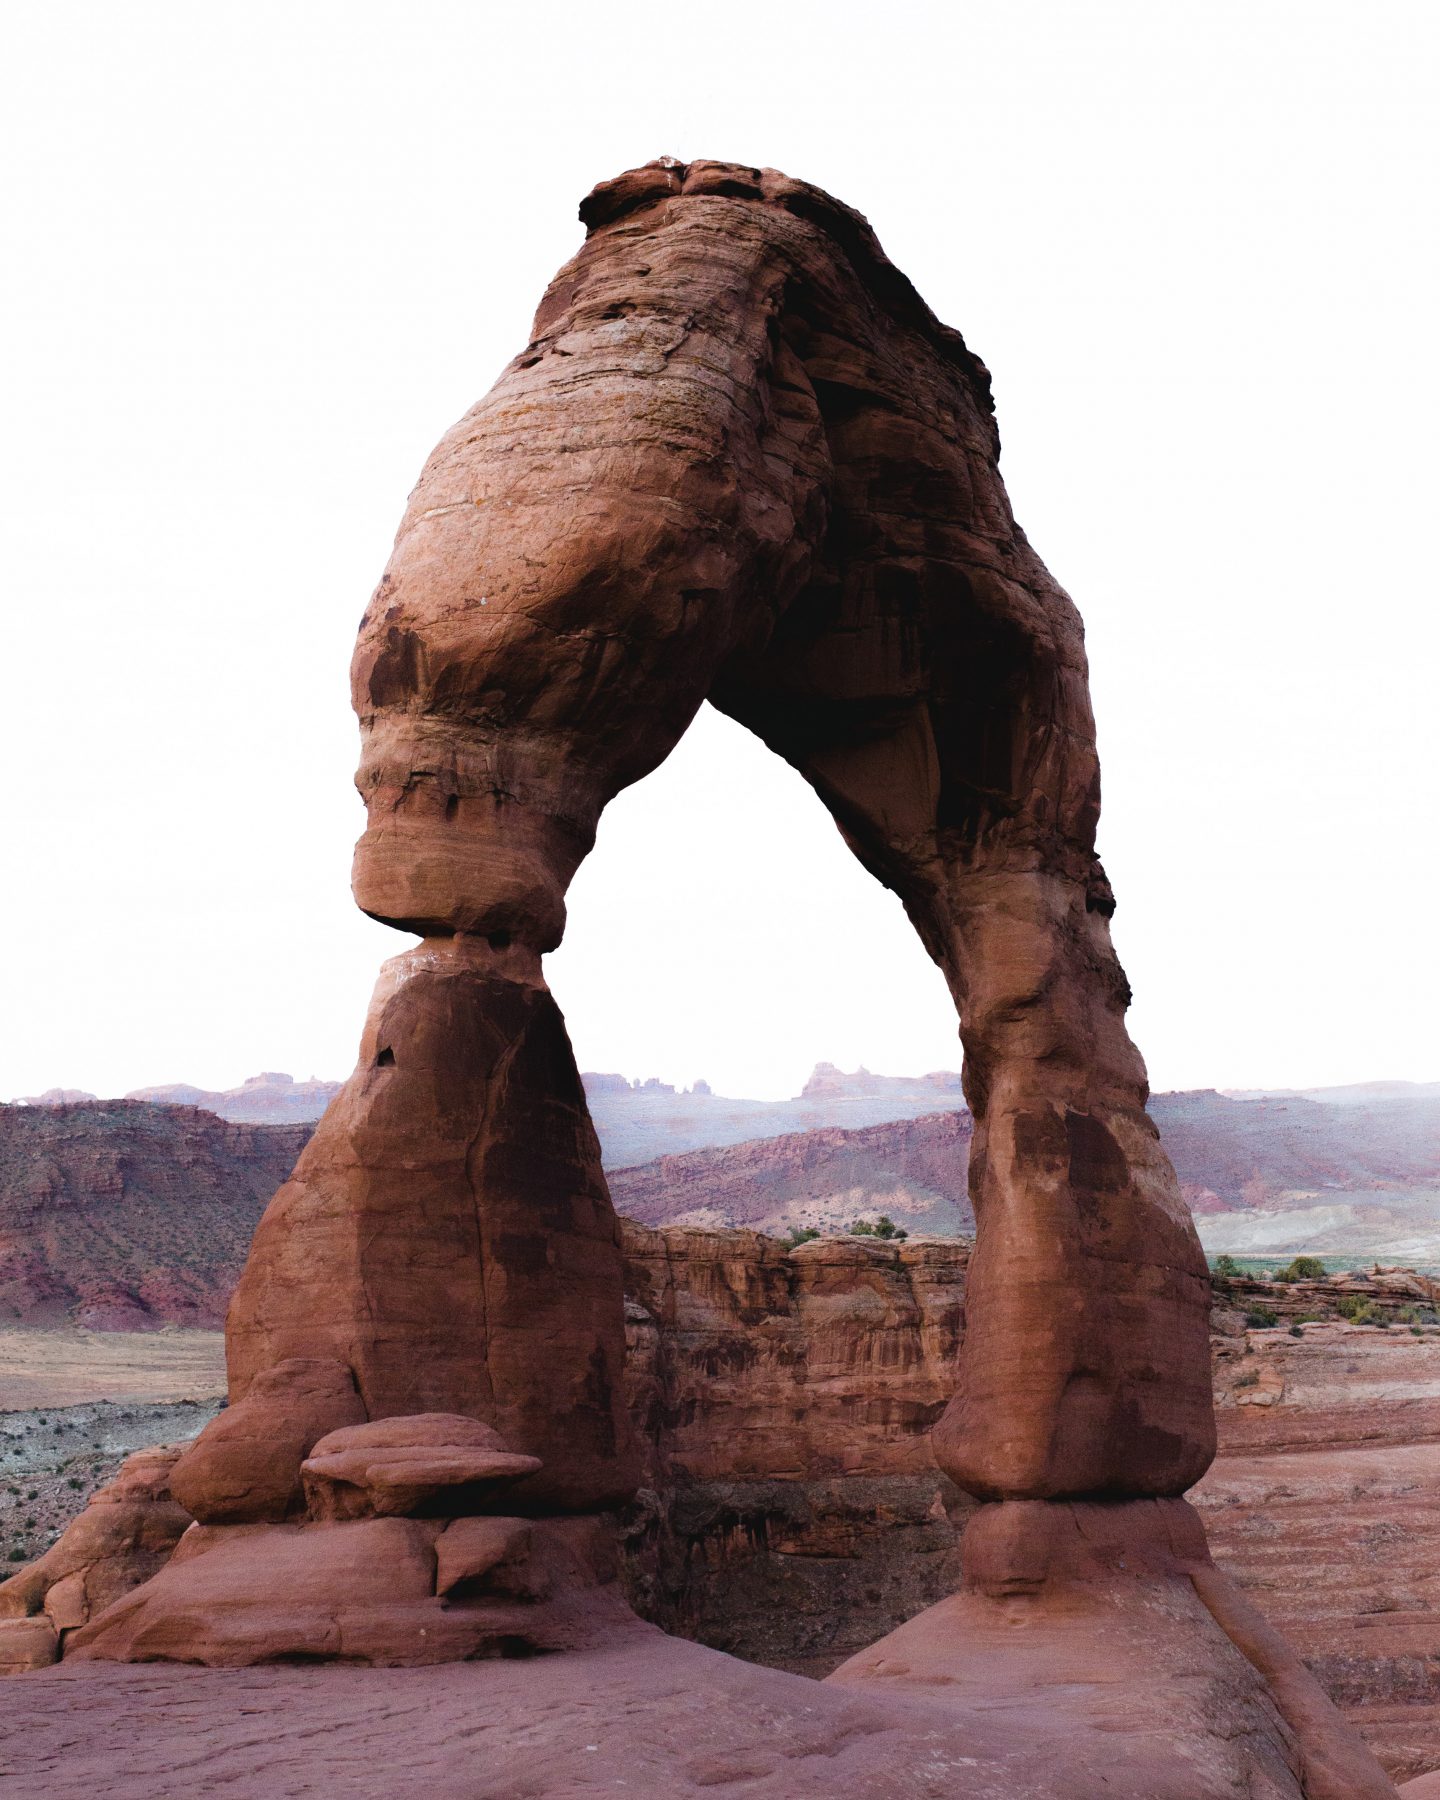
Don’t stand directly underneath the arch.
This doesn’t go solely for the Delicate Arch, but actually most of the arches in the park. While at first, I thought this was a regulation in case the arch collapses, the NPS says it’s for other hikers to enjoy the arches in their rawest state and for safety reasons, but perhaps it’s a triple threat sort of thing? At any rate, there are some arches in this park that I did stand under, but I chilled next to the side of this one.
-
Stop at the twisted donut for another incredible view of the Delicate Arch!
A small detour before you arrive at the Delicate Arch is the Twisted Donut Arch! This is a tiny little window that is great for an alternative view/photograph of the mighty arch. A lot of people pass right by it, but make sure you stop here on the way up or down and take in the view!
-
Be careful/reconsider the Delicate Arch trail in rainy/snowy conditions.
While a large part of the Delicate Arch hike is fine to make in not-so-ideal conditions, there is a portion of the trail that has a great amount of incline up some slickrock. It’s called slickrock for a reason and when it rains, you definitely don’t want to be trying to trek up this thing. It’s very unsafe and you should consider coming back when hiking conditions are safer. There were some hikers that fell and died due to poor conditions. I’m not saying to reconsider it all together, but just be aware that this trail can be very dangerous.
-
Don’t underestimate the beauty and solitude of a wintertime visit.
Not only does a winter visit to Arches National Park offer solitude, but the entire park is also blanketed in a subtle snowfall that is GLORIOUS. This goes for many of the other national parks in Utah, so a road trip is also noteworthy for this season. I am considering another visit to the parks in winter because the two experiences are drastically different from each other but magnificent in their own ways. Plus, you may not have another soul in sight at the arch! That’s worth it in and of itself.
MORE HELPFUL GUIDES FOR YOUR TRIP TO ARCHES NATIONAL PARK:
– Packing For A Day Hike: 12 Adventure Essentials To Get You Exploring
– A PERFECT 3-Day Itinerary For Arches National Park
– 10 Arches National Park Hikes That Will BLOW Your Mind
– The Ultimate Guide To Camping In Arches National Park
– Tower Arch Trail: The Best Hike In Arches National Park
ADD THESE ARCHES NATIONAL PARK HIKES TO THESE OTHER ROAD TRIP STOPS CLOSE BY:
– The ONLY Utah National Parks Road Trip Itinerary You Need
ZION NATIONAL PARK
– How To Conquer The Narrows Hike In Zion National Park (Complete Guide)
– 2 Days In Zion: The Ultimate Zion National Park 2 Day Itinerary
CAPITOL REEF NATIONAL PARK
– How To Spend One EPIC Day In Capitol Reef National Park
– Hiking The Cassidy Arch Trail In Capitol Reef National Park
BRYCE CANYON NATIONAL PARK
– The Ultimate Guide To Camping In Bryce Canyon National Park
– 10 Jaw-Dropping Bryce Canyon National Park Hikes You CANNOT Miss
– One Day In Bryce Canyon: The Perfect 1-Day Itinerary
CANYONLANDS NATIONAL PARK
– The 10 BEST Hikes In Canyonlands National Park
HAVE YOU VISITED THE DESERT BEFORE? SHARE WITH ME IN THE COMMENTS BELOW!

DID YOU FIND THIS GUIDE TO THE DELICATE ARCH USEFUL? SAVE IT FOR LATER ON PINTEREST!


Very useful information, but I just need some information if there is public transportation from Moab to Delicate Arches trail head as I am solo traveler. Thank you and have a nice weekend.
Hi Hartono! There aren’t any buses that run through Arches NP, so you’ll have to take a taxi or catch maybe chance a hitchhike if you don’t have your own car.