
Last Updated on September 14, 2025
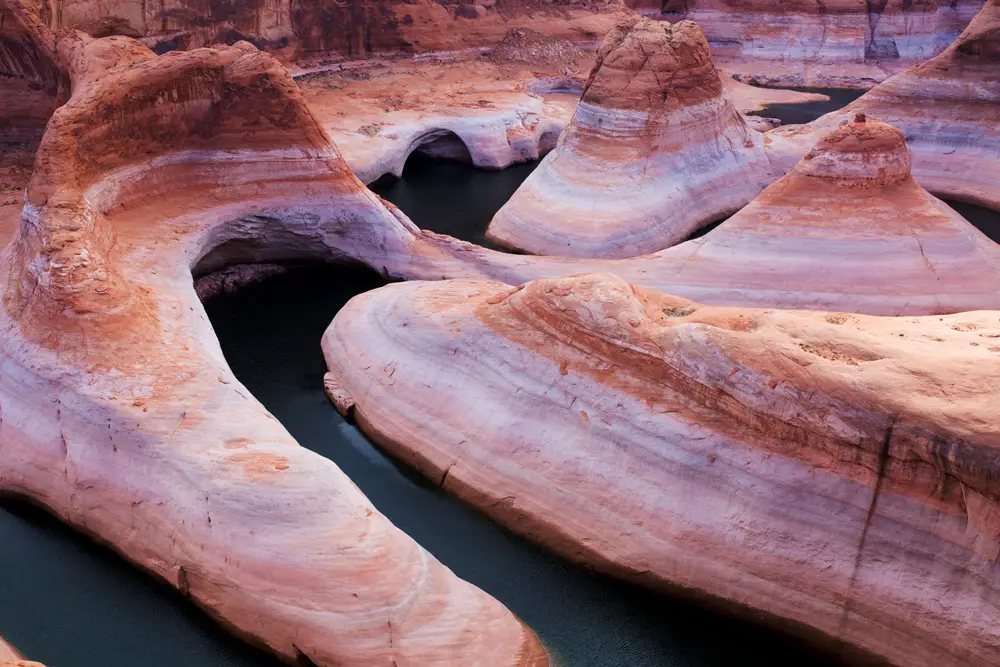
Nestled in the heart of the Glen Canyon National Recreation Area is an adventure like no other, backpacking Reflection Canyon.
After a National Geographic photographer placed this winding canyon on our outdoorsy radars, a handful of backpackers take on this challenging hike each year to enjoy a remote, untouched gem and unofficial bragging rights. If you’re crazy enough to push past the barrage of caveats to reach somewhere truly spectacular, this guide is you for.
For those who are eager to know how to visit Reflection Canyon, you must be equipped with off-trail navigation skills, backpacking experience, a trough’s worth of water, and just a touch of grit. In this guide, I’ve outlined everything you need to know about completing this backpacking trip comfortably and safely.
Before I begin, I want to acknowledge the history of this area. Once at the official viewpoint, you’ll be able to see Navajo Mountain towering in the distance over a still Lake Powell. Everything on the other side of this canyon is Navajo Land, and, truthfully, the land you’ll be standing on was also once Navajo Land and home to many other indigenous tribes.
Places like these were once sacred to people who no longer call them home, so let’s keep them neat and untouched for the next explorers who take this challenge on. While you’re here, please remember the 7 Leave No Trace Principles.
Consider adding one of the best things to do in Kanab if you’re exploring other parts of the south or other backpacking trips in Grand Staircase Escalante.
Please note that some links on my blog are affiliate links. If you choose to purchase through these links, I may receive a small commission at no extra cost to you. When What Do You Sea is supported in this way, you are helping me remain an independent travel blog where I can continue to create free and detailed guides. Read my disclosure for more information.
Trail Quick Facts
Type of trail | Out & Back
Trail Difficulty | Moderate – Difficult.
Although this hike isn’t physically demanding, the lack of an official trail and resources is what makes it a challenging adventure. How difficult the hike really is will depend on your experience level, weather conditions, pack weight, and physical fitness. This trail is not recommended for beginner backpackers or pups.
How long is the Reflection Canyon hike? Roughly 16-18 miles out and back.
Everyone tends to clock in at a different mileage for this trail due to the route-finding. Our group clocked in 8.18 miles on the way in and 7.69 on the way back, putting our total at around 16 miles.
How long does it take to hike the trail? | 4-6 hours one way.
This depends on your fitness level, what breaks you take, and if you get turned around. It took us about 4 hours and 15 minutes both ways, with minimal breaks, which is considered pretty quick.
Total elevation gain | 1,234 feet
Peak elevation | 4,466 feet
Average elevation | 4,200 feet
Trailhead location | 37.2521698498235, -110.97351703127622 (Google Maps)
Crowds | None.
Don’t expect to run into anyone along this trail. Although this location has gained popularity in the outdoor space over the years, the amount of planning and effort it takes to get here has kept it untouched. When I hiked this in late March of 2022, we saw two people finishing at the trailhead and two more along the trail going in and that was it.
Dog friendly? Yes, but it’s not recommended. Factor in the additional water, food, wag bags, the lack of shade, and paw protection and it may not be the best choice for you or your doggo in such remote conditions.
Permit | Yes (see below).
Do you need a permit for Reflection Canyon?
Yes. Permits are required for all backcountry trips in the Glen Canyon National Recreation Area and camping on Hole-in-the-Rock road.
You can pick up a permit at the Escalante Interagency Visitor Center or at any of the established trailheads on Hole-in-the-Rock Road. The Glen Canyon National Recreation Area requires a fee to get in, so if you’re going to the Escalante Interagency Center. Entry is $35. If you have an America the Beautiful Park Pass, that gets you into the area for free.
Reflection Canyon is a route and not a maintained trail, so you cannot pick up a permit for backpacking or camping at its trailhead. The closest trailhead with permit forms is the Hurricane Wash Trailhead, but I still recommend going to the Visitor Center to grab a permit on your way down since they have clean water, bathrooms, and rangers that can inform you about the weather.
The permit process is uncompetitive and unlimited, so you can walk into the center and grab one for $6. Easy peasy.
Best Time To Visit
The best time to hike Reflection Canyon is late March to April, or October when the weather is mild and more favorable.
We did this trail in late March and while it was still chilly, we had nearly perfect conditions. Given the chance, or drive really, to do this again, I would aim for the beginning of April for a springtime hike.
Spring | Spring is one of the best times to do the hike. The weather can be a little more unpredictable in the springtime with the mixture of cold and warm air, but with daytime temperatures ranging from 50 to 70 degrees, this is one of the best times to do the hike as long as you keep your eyes on the forecast.
Summer | This season brings the challenge of summer monsoons and high daytime temperatures nearing the 100s. Spontaneous rainfall in the summer can cause the Hole-in-the-Rock road to be impassable and you can get stranded for days waiting for the road to dry up. With summer being so hot, you’ll need to carry in a lot more water since this hike doesn’t have any water or shade. May to September is rather unfavorable with these conditions in mind.
Fall | Fall is another great time to plan a Reflection Canyon backpacking trip because the weather will finally be cooling down. I would shoot for October to avoid the last heat of the summer and before the temperatures get below freezing at night in the late fall. Even the month of September can feel like the daytime temperatures near the 100s. October brings favorable weather and low wind making it very ideal.
Winter | If you want to visit in the winter, this season requires specific 4-season gear and experience to do it comfortably. High winds and below-freezing temperatures are the norm during the wintertime. It’s not impossible, but given that there aren’t crowds here anyway, it’s best to plan for spring or fall.
How To Get To Reflection Canyon Trailhead
The trailhead is about 50 miles south on Hole-in-the-Rock Road. You’ll drive on State Highway 12 and head five miles south of the town of Escalante until you reach a turnoff for Hole-in-the-Rock, 50-Mile Bench. There is a massive sign next to the dirt road that will signal the turnoff. You can’t miss it.
Tip | Make sure to fill up your gas tank in Escalante before you head down this road since it’s the last place you’ll get any type of amenities. You definitely don’t want to have to pay to get your car towed off this road.
Once you get on the road, reset the odometer on your car so you know how far you’ve gone. While it seems like it would be a swift drive, the trailhead is 2 hours away due to the rough road conditions.
On the drive, keep an eye out for Fifty-Mile Point on the right where you’ll find the small parking area. The trailhead isn’t marked, so I recommend saving the coordinates before you get out of service. I used the GAIA App to track our location on the road since it saves your location offline and this helped so much to get our group here.
Important note | A 4-wheel drive and high clearance vehicle are required for this road. Hole-in-the-Rock road is only maintained once a year and is not for the off-road novice. As you get closer to the trailhead, there are large hills, exposed edges, sharp rocks, and other hazards to navigate which is why a more rugged vehicle is crucial.
We got here in a Subaru Outback and had no issues. Come to our utter amazement, our group saw a standard minivan driving past the trailhead once we finished our backpacking trip. Which, made our jaws drop more than standing at the viewpoint the day previously. I’m not sure how they made it out given the low clearance. Please do not risk you, your vehicle, or your wallet to get out here.
Check the weather forecasts for this area so that you can plan your trip accordingly. In the event that it rains, the road will become muddy and impassable, so you could get stuck out here for a day or two in bad weather waiting for the road to dry up. We planned on camping on Hole-in-the-Rock for 3-4 days, so we had extra food and three of these 5-gallon water cubes (they are my favorite road trip essential). Come prepared for anything, but if there is rain in the forecast do not attempt to drive down the road.
Use the map to help you navigate the area and nearby stops! For best use, download this map to your smartphone so you can use it offline (instructions here).
How To Get to Reflection Canyon
Due to the challenges of this backpacking route, most hikers backpack to Reflection Canyon in two days. Since there is no shade and no water the entire way, planning anything longer than two days would be challenging.
We combined this hike with another two-day trail, Coyote Gulch, and it made for the perfect adventure while exploring the Grand Staircase Escalante National Monument and Glen Canyon National Recreation Area. There is so much to do in this region, and on Hole-in-the-Rock road to plan the ultimate string of adventures.
Recommended Backpacking Itinerary
Planning an itinerary for this backpacking trip is straightforward since this is a simple out-and-back trail. Everyone tends to follow the same protocol which is as follows:
Trailhead | 37.25217245874294, -110.97351819329278 (Google Maps)
Day 1 | Hike out and camp at the Reflection Canyon overlook
Day 2 | Hike back to the trailhead
Route Description
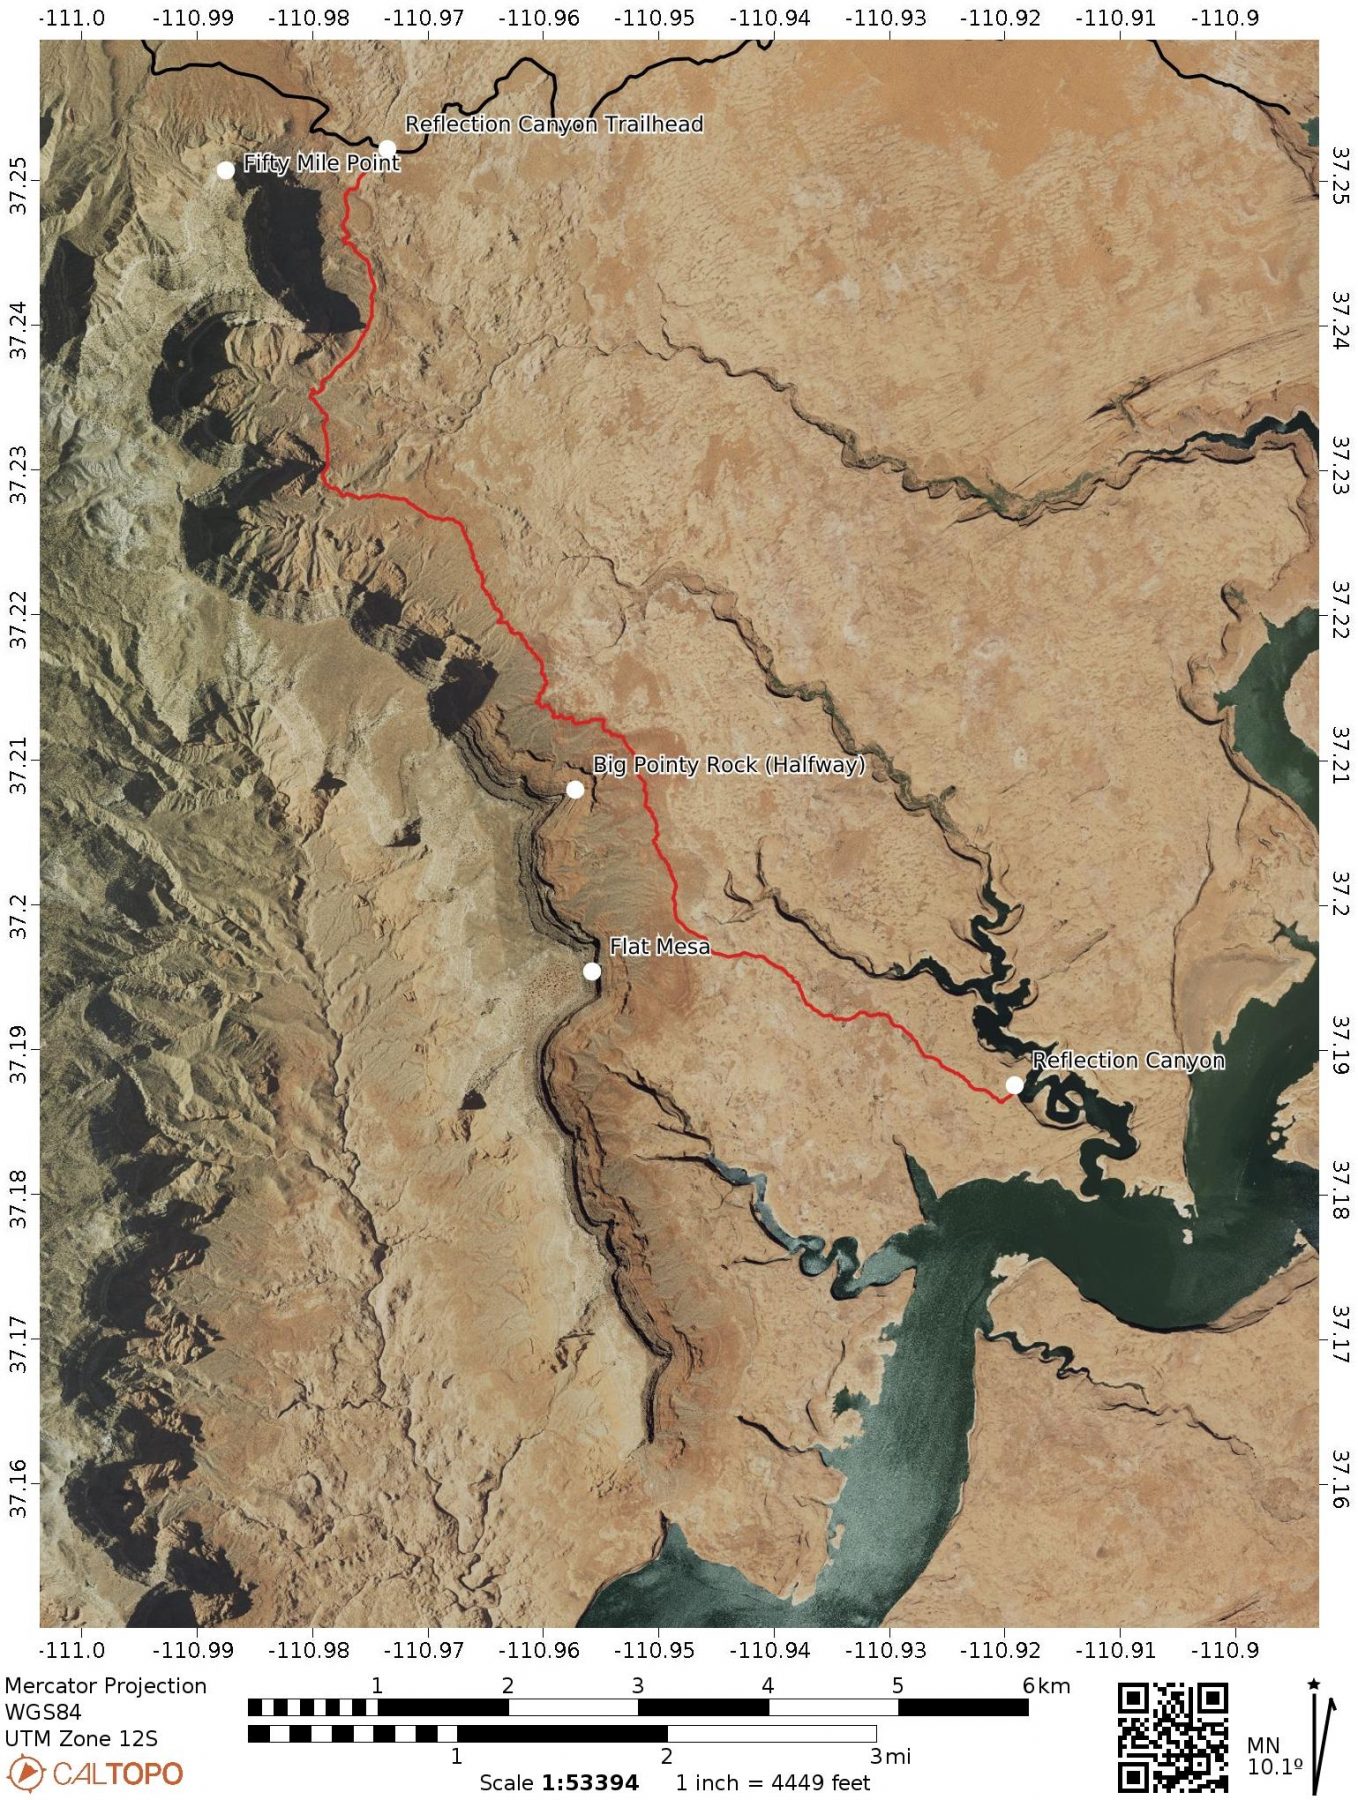
The journey of a thousand miles… *record scratch* Er uh, just about 16 miles, begins with the first step headed south with Fifty Mile Point shooting into the blue sky on your right. One of the best pieces of advice I have is to hang along Fifty Mile Point Mountain. These steep cliffsides will have a handful of important landmarks to watch for that are going to help guide you on your way. I’ve dotted them on the map, so make sure you note these on yours or just make a mental note of them for when you’re out there:
Big Pointy Rock | Very obviously named, the halfway point is when the big pointy rock on your right will jut the furthest towards the trail. This is when you’ll know you’re halfway there. (It isn’t named “Big Pointy Rock“, I just couldn’t remember the actual name, so I made a Lion King 1 1/2 reference when we were headed back because I was stoked to be back on the established trail).
Flat Mesa | Once you reach the first edge of the flat mesa, that’s your signal to start cutting in towards the canyon and beginning the unmarked route to the Reflection Canyon Viewpoint.
click the map to enlarge the Reflection Canyon map
Now that you have those landmarks noted, let’s get to the trail, shall we? For the first 6-ish miles, you’re going to follow the dirt path toward Flat Mesa. Although this trail is well-marked and trafficked, I would be adamant about checking your GPS because there are a lot of small forks and social trails that can get you off-trail, in the wrong direction. Some of which head east towards 50-100 foot slot canyons, so keep an eye on your route. When in doubt, take the better-worn path.
Once you hit close to the two-mile mark, you’re going to reach a fence and a watering hole shortly after that, and then the trail will split a little bit. We went right in and left on the way back. In this case, both paths will eventually meet back up, but I found the left to be a bit easier. This is your first “hey I haven’t hiked two miles in the wrong direction” notice that isn’t a cliffside, and on your way back, it feels like that final lap in Mario Kart.
Keep hiking along the cliffside and soon you’ll reach the Big Pointy Rock. You’re halfway!
Past this, it’s a mile or so more until you reach Flat Mesa, where your GPS becomes your new best friend. Once you align yourself with that first square edge of Flat Mesa, you’ll cut into the maze of slick rock headed southeast. At this point your GPS, whether you’re using All Trails or GAIA, will show a fork in the trail, and I highly recommend going left.
When we inquired about this fork at the visitor center, the ranger said he didn’t know of one existing, and I’ve also read reviews that going right is a lot more difficult. When we got to this portion, I didn’t see another way to go, but I read about another blogger who went this way and confirmed that it’s harder to navigate. So if you make it to the far edge of Flat Mesa, you’ve gone too far. Stick to the first corner.
Let the games begin! Whip out your favorite offline GPS and get cookin’. Before you go, I do want to note a few things.
1. Stay on your GPS line, but also observe where you’re walking up ahead. Sometimes there are ways to stay on route but go around challenging portions.
2. There are cairns along this route, and while I did find them useful, I didn’t rely on them 100%. While walking I often asked myself, “Is this a cairn or just a collection of rocks?“
3. On your way in, you’re probably going to go in the wrong direction or go in a roundabout way a few times, but your journey out will be way more direct. In fact, I found the way out to be a hell of a lot easier to navigate (thank goodness).
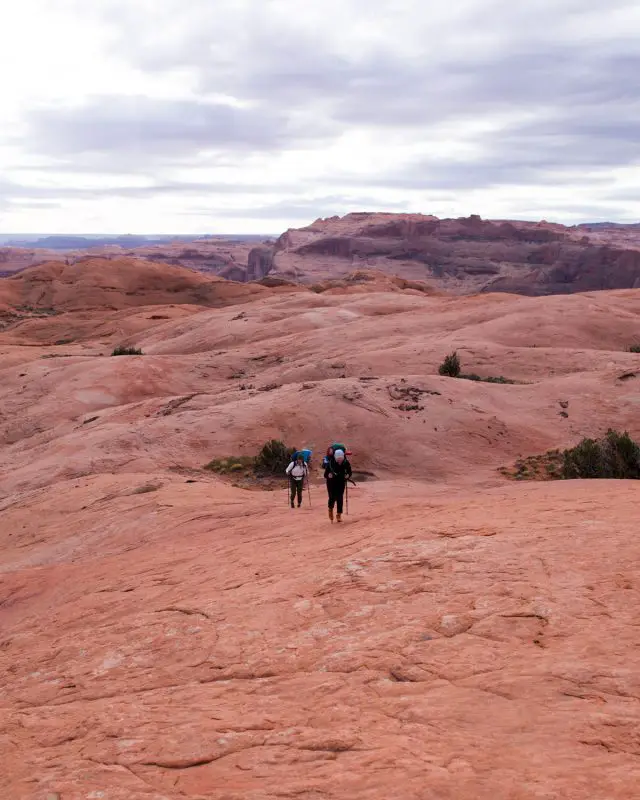
The last portion of the trail requires small up and down pushes over steep slick rock, and after two miles of this, my brain capacity and ankles were SPENT. I was stoked to find a beautiful spot to camp, pitch the tent, and take in the views at the Reflection Canyon Overlook.
FAQ About Getting to Reflection Canyon
Can you hike Reflection Canyon in a day? | This would be an incredibly LONG day, but hiking it in a day is possible. Be sure to stow extra water in the first 4-6 miles of the trail and leave a note: “Water cache – please don’t take/drink.” One of my favorite parts about my backpacking trip was being able to experience both sunrise and sunset here, but if time doesn’t allow you to do that, it’s understandable.
Can you boat to Reflection Canyon? | The best views of the canyon are seen from above, but you can get there by boat much easier, and only in a day. I recommend picking up a rental from Bullfrog Marina and leaving from there, or considering a boat tour if you’re not comfortable venturing out yourself. Be mindful of the Lake Powell water level before you leave and plan your trip because that will dictate how far into the canyon you can go.
Can you kayak to Reflection Canyon? | It is possible to kayak between the iconic rock formations, but that requires more advanced planning. Hidden Canyon Kayak is a great resource for getting more information about a trip like this.
Can you drive to Reflection Canyon? | There is no way to get to Reflection Canyon by car as it is too remote.
Helicopter Tour Over Lake Powell | Now if you want to see Reflection Canyon, but don’t want to make the journey to get there, Antelope Air has a scenic flight over this area that would probably give you a better view than the hike, boat tour, or kayak tour combined…
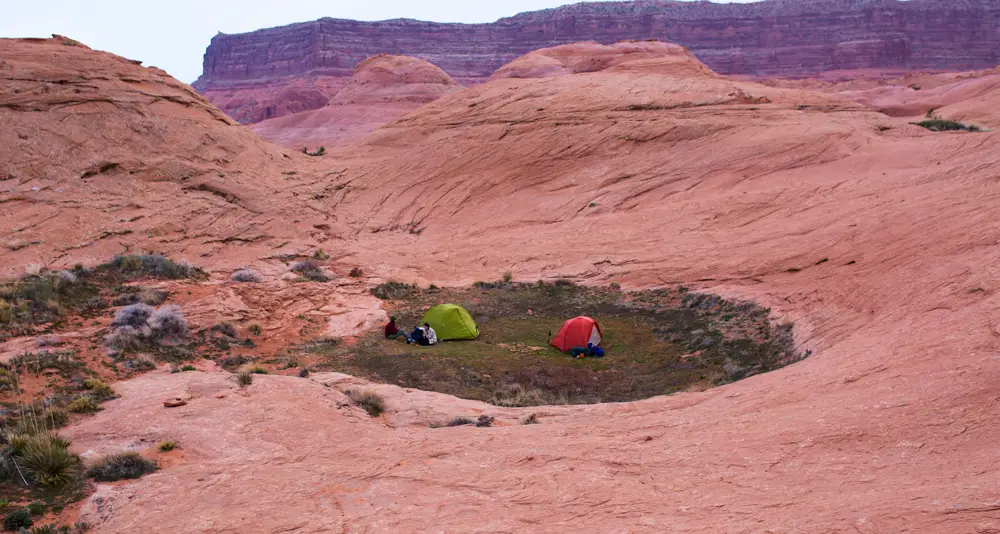
standing at the viewpoint looking back at our campsite
Camping at the Overlook
There are no designated campsites along the trail, or at the viewpoint, so you can camp wherever you like. Finding a flat camping spot is a bit challenging once you’re here, even our grass patch wasn’t flat (see above). If you go scouting, there are some small patches on the left cliffside that can fit 1-2 tents that have incredible views if you’re here in good weather.
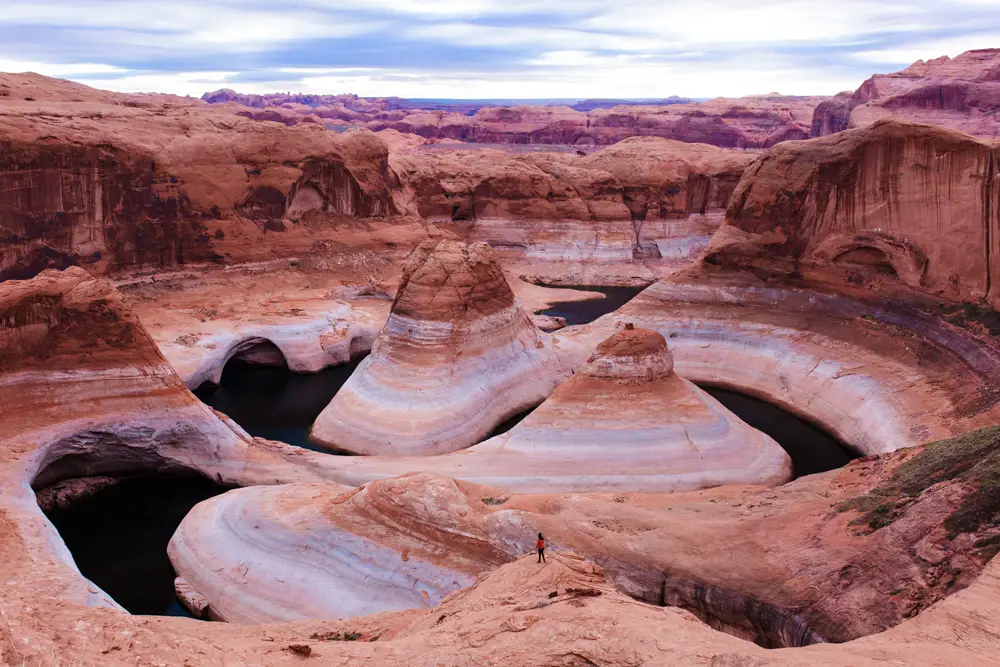
While very steep, if you climb up far enough past the main viewpoint, on the left, you can snag a view of both Reflection Canyon and Lake Powell that is so worth that final push to get to.
I wish we could have ventured up there, but with 30 mph winds, trying to keep a freestanding tent on a steep cliffside wasn’t really in the cards for us. Even with my tent staked down, it felt like we could have blown away in the night with how brutal the windspeeds were. And of course, the weather was PERFECT the day we hiked out *shakes fist*.
I recommend bringing a freestanding tent or considering cowboy camping if the conditions are favorable enough to do so. If you have a tent that requires stakes, camp on the grass patch in poor weather, otherwise you’re going to have a hell of a time getting it pitched on the solid rock face. The only thing you’ll have to stake it down are some small rocks.
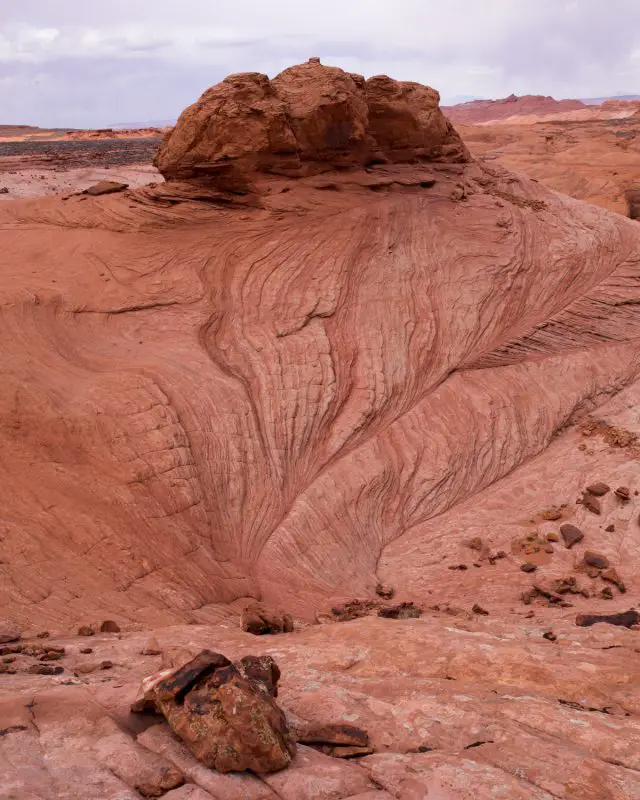
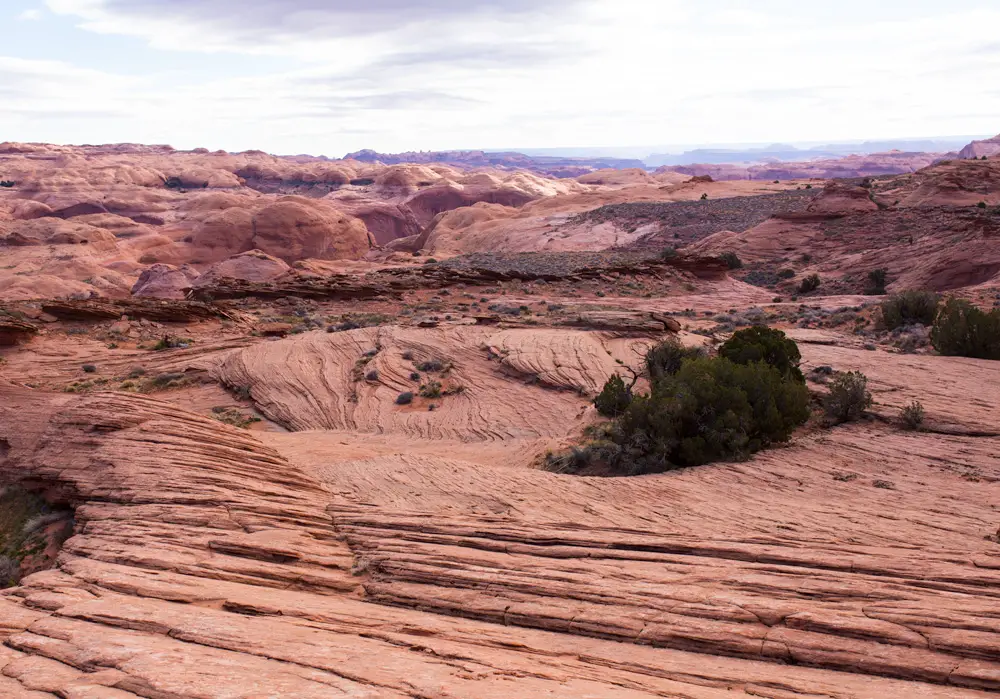
The photos above are examples of the unmarked route – once you see this rock on the left side of the trail, that is when you’ll cut into the canyon and begin the route-finding portion.
Challenges of the Route
Water | There is no water along the entire trail. It may seem like you’ll be able to get water once at the viewpoint, but Reflection Canyon is massive, and getting water from Lake Powell is impossible.
For this trip, you should be carrying at least 4 liters (1 gallon) of water per person, per day. If you’re traveling in the summer months, raise that up to 6 liters (1.5 gallons) per person, per day. This will add a significant amount of weight to your pack, but you don’t want to run out of water on this trail. If you’re bringing dehydrated meals that require water, be sure to factor that in, or bring meals that don’t require it.
Something worth considering is a water cache around the halfway point. Another good spot is by the barbed wire fence you pass through a few miles from the trailhead. You can stash 1-2 platypus‘ and then on your hike out you can pick it up. Be sure to place some kind of sign with the message “water cache- please do not remove“.
Weather | Although the desert is notorious for being hot and sunny, the weather can change in an instant. If a rainstorm is imminent, it’s not recommended that you attempt this trail.
Exposure | There is no shade on this entire trail which will require you to be diligent about the weather and how you’re going to bring in enough water. Be sure to also bring proper sun protection.
Remote location | From the start of Hole-in-the-Rock road to the trailhead and on, you’re not going to have any service, so you’ll want to have some type of satellite device in case something happens.
Bugs and critters | There isn’t an abundance of wildlife along the Reflection Canyon trail, but you do want to watch out for a handful of critters and bugs. Raven and mice are in the area, so you want to protect your gear and food at night. Rattlesnakes have been spotted in this area, so be careful where you put your hands and feet, and also make sure to check your shoes for scorpions when you’re putting your hiking boots back on.
Wag bags required | You cannot dig catholes for your waste, so all solid human and pet waste must be carried out, including toilet paper. You’ll need wag bags on this trail, so make sure you pick those up before you head out.

What To Pack
Backpack | I brought my Osprey Eja 58L bag for this trip and it had optimal space for everything I needed. The main thing to test before you go is to pack your bag with all the water you’ll need to make sure it all fits comfortably. After this trip, I upgraded to an Osprey Aura 65L and would have loved to have the extra space for more water.
Sleeping bag | The time of year you hike to the canyon will determine what temperature rating you’ll need your sleeping bag to be. My bag for this trip was rated to 0F for early Spring. Probably a touch overkill, but it’s what I had and I slept more than comfortably.
For this time of year, you can probably get away with a lightweight 15-degree or 30-degree bag. My hiking partner brought a 40-degree and was very cold the night we stayed there.
Sleeping pad | My Therm-A-Rest sleeping pad is my go-to for all my backpacking trips and it’s one of the best insulators against colder nighttime temperatures.
Pillow | My NEMO Fillo brings me all the comforts of my home to my tent. It’s on the heavier side but worth the weight.
Trekking poles | On the steep pushes of slick rock near the end of the trail, trekking poles will help cushion your ankles and other joints. I have sensitive hips and these helped me so much in some portions.
Cook system | My tried and true cooking setup is my Jetboil MiniMo with fuel, the GSI Essential Spoon, my favorite coffee mug, and matches.
Water | Using both a hydration bladder (linked similar) and platypuses is crucial to carrying all the water you’ll need. A filter isn’t needed because there aren’t any water sources.
Headlamp | I take this one on every backpacking trip.
Navigation | I used three different forms of navigation for this: my GARMIN (linked mini) GAIA App, and a National Geographic Topo Map. Paper maps are useful for the main landmarks I discussed above in the route description, but they’re not going to help you for the last two-mile push to the viewpoint. You definitely want some type of offline GPS. I used Caltopo to map my route on my Garmin and used GAIA GPS Premium for backup.
First aid | My go-to for first aid. I love that you can order refills for this to keep everything uniform and compact as well. It supplies everything you need for a few days in the backcountry and weighs next to nothing! I will recommend packing a few extra bandaids in here before you head out since this doesn’t give you too many.
Sun protection | This trail is fully exposed. You’ll want a sun hat and mineral sunscreen to protect your skin no matter the season.
Clothing | These are some of my tried and true backpacking gear items that made my trip comfortable and warm during the late Spring.
(x1) Rain Jacket | Arc’teryx Zeta SL Rain Jacket (linked similar)
(x1) Down Jacket | Fjallraven Greenland Down Jacket
(x1) Baselayer Top | Arc’teryx Quadra Crew Shirt (linked similar)
(x1) Baselayer Bottom | Patagonia Centered Tights
(x1) Hiking Shorts | Patagonia Baggies
(x1) Hiking Pants | Fjallraven Keb Trousers
(x1-2) Shortsleeve Tops | Patagonia Capilene Cool Trail Shirt
(x1) Longsleeve Top | North Face Wander Long Sleeve
(x2-3) Socks | Smartwool Performance Hike Light Crew & Smartwool Classic Hike Extra Cushion Crew for sleeping.
(x1) Sun Hat | Columbia Bora Bora Booney II Hat
(x1) Warm Beanie | Patagonia Fisherman Beanie
(x1) Gloves | 66North Vik Gloves
(x1) Hiking Boots | KEEN Targhee III
Knife | I carry this knife on every backpacking trip and I LOVE it. Although, you may want something a little bigger like a Swiss army knife or a regular pocket knife.
Food | Since this is an out-and-back trail, you can pretty much bring whatever backpacking meals and snacks are your favorites given your bag space. I recommend bringing meals that don’t require water to be cooked or limiting the amount that do.
Permits, ID, and cash | These are all necessary for your journey. If you’re stopped by a ranger, they will ask for your permit and possibly proof of I.D. Plus, in the event that something happens to you, you have identification. We didn’t see a ranger out here, but I have read of other groups running into one.
Toilet paper, wag bag, & pee cloth | In order to follow the 7 Leave No Trace Principles, you must pack out all your solid human waste in wag bags, as well as your toilet paper. I replaced toilet paper with my reusable Kula Cloth to help reduce my waste as a woman in the outdoors.
Hand sanitizer | You’ll want to have hand sanitizer for clean hands after using the bathroom before you grab your favorite snack, and before you begin cooking all of your meals.
Camera gear | Pack your favorite camera and wide lens. I would say 16-24mm is ideal. I brought a 35mm and just barely captured the entire canyon. The canyon is A LOT bigger than you’d think. The wider your lens the better. Also, it is illegal to fly a drone here.
Final Thoughts
Reflection Canyon is a challenging and remote backpacking route in Southern Utah that reaps an unimaginable amount of reward when completed. With the right tools and experience, you can get out there safely, but this trip will definitely test you in more ways than one.
If you have any questions about hiking the trail, please don’t hesitate to reach out via Instagram (@aarenprody). My DM’s are always welcome to questions, or a bit of encouragement.
Where to next?
The ONLY Utah National Parks Road Trip Itinerary You Need
Capitol Reef National Park
How To Spend One EPIC Day In Capitol Reef National Park
Hiking The Cassidy Arch Trail In Capitol Reef National Park
Bryce Canyon National Park
One Day In Bryce Canyon: The Perfect 1-Day Bryce Canyon Itinerary
10 Jaw-Dropping Bryce Canyon National Park Hikes You CAN NOT Miss
The Ultimate Guide To Camping In Bryce Canyon National Park
Zion National Park
2 Days In Zion: The Ultimate Zion National Park 2-Day Itinerary
How To Conquer The Narrows Hike In Zion National Park (Complete Guide)

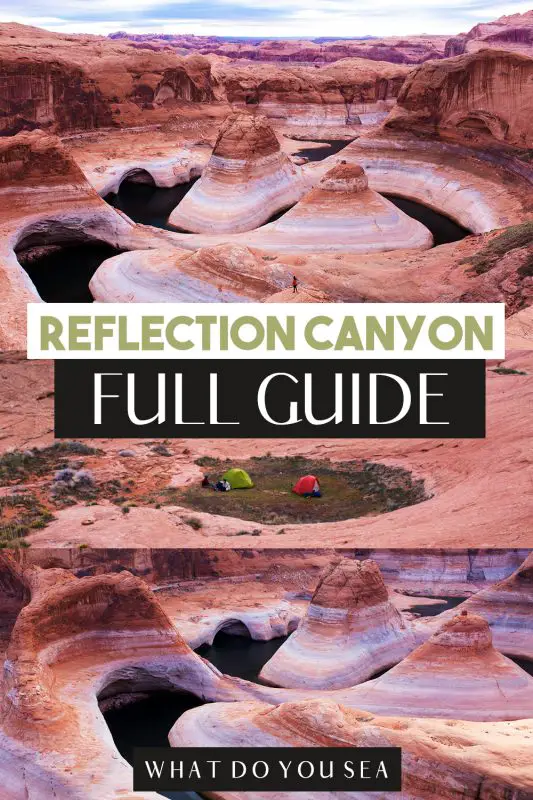
Did you find this guide to Reflection Canyon useful? Save it to one of your Pinterest boards!

Is anyone a available for horseback riding the canyon?
I’m not entirely sure, but I’m going to go ahead and say no since it’s a remote location that isn’t well known.
Thanks for sharing this wonderful guide Aaren. Fabulous post!
Glad you enjoyed it Hussain (: